


Basic introduction to Partition Assistant
It is divided into three versions:
Partition Assistant Home Version - Recommended for ordinary beginner users
Partition Assistant Professional Edition - Advanced or Professional Users Please Use It
Partition Assistant Server Edition - If your system is a service series such as Win2003, Win2008, please use this version.
All versions are free!
At the same time, Partition Assistant can work on all operating systems, including Windows 7/2000/XP/Vista/2003/2008 and WinPE.
Whether they are ordinary users or advanced server users, Partition Assistant can provide them with full-featured, stable and reliable disk partition management services.

Features of Partition Assistant Software
1. Adjust the hard disk partition size
Perform operations such as expanding, shrinking, merging, and splitting partitions without losing data.
2. Hard disk partition tool
Supports fast partitioning, creation, deletion, formatting of partitions, partition recovery, 4KB alignment, data erasure, etc.
3. Cloning and system migration
It is a rare lossless partitioning tool that can migrate the system to a solid state drive and realize hard drive cloning.
4. Install Win 10 to USB flash drive
Easily completely migrate your Windows 7/8/8.1/10/11 system to a new solid state drive.
Partition Assistant installation method
1. Download the Partition Assistant Professional Edition software package from this site. After the download is complete, we will unzip it and get an exe installation file. Double-click the exe file with the left mouse button to enter the installation interface in the picture below. We click Next to continue the installation.

2. Enter the Partition Assistant Professional Edition software license agreement interface. You can first read the usage agreement of the interface. After reading, click I agree to this agreement, and then click Next.

3. Enter the Partition Assistant Professional Edition software installation location selection interface. You can click Next directly. The software will be installed to the system C drive by default. Or click Browse, select another installation location, and then click Next.

4. Enter the start menu folder selection interface of the Partition Assistant Professional Edition software. We directly click "Next" at the bottom of the interface.

5. Enter the additional task selection interface of the Partition Assistant Professional Edition software. On the interface, we can see that there are two additional shortcuts. We can choose according to our own needs and then click Next.

6. Enter the Partition Assistant Professional Edition software preparation interface. We can see the installation location, menu folder and additional tasks we set in the interface. After confirming that it is correct, we can click Install to install. After the installation is completed, we can click Done at the bottom of the interface to open the software and use it.


Summary of installation steps:
1. Download the Partition Assistant Professional Edition software package from this site, unzip it and double-click the exe file to run it, click Next to continue the installation.
2. Read the user agreement, click I agree to this agreement, click Next,
3. On the installation location selection interface, click directly or click Browse to select other installation locations and click Next.
4. Select the additional shortcut and click Next.
5. Enter the installation preparation interface, click Install and wait for completion.
How to use Partition Assistant
1. How to expand C drive with Partition Assistant
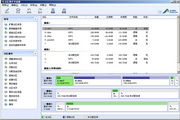
1. After we install the Partition Assistant Professional Edition software on the computer, we can open the software and enter the main interface in the picture below. We can see the size of the computer disk in the interface. It can be seen in the picture that the size of the C drive is 15.01GB and the size of the F partition is 20.89GB.

2. Next, we can compress the F partition and reduce its size to 15.90GB. We right-click the F drive, and then click the "Adjust/Move Partition" option in the pop-up options. Then we enter the partition adjustment interface, as shown in the figure below. We put the mouse on the left side of the partition, and then drag the left handle to the right to reduce the partition until it is reduced to 15.90GB.

3. After the reduction is completed, we click OK at the bottom of the interface to return to the main interface of the Partition Assistant Professional Edition software. We can see that the F partition has become 15.90GB in size, and we can see 4.99GB of allocated space behind the C partition, as shown in the figure below.

4. Next, we right-click the C partition, as shown in the figure below, click the "Adjust/Move Partition" option in the pop-up menu, and then enter the partition adjustment interface.

5. Next, we can adjust the size of the C drive in the partition adjustment interface. We move the mouse to the right side of the C partition, and then drag the right handle to the right to expand the size of the C drive until it reaches 20GB.

6. After we complete the adjustment, click OK at the bottom of the interface to return to the main interface of the software. At this time, we can see that the size of the C partition has been adjusted to 20GB.
2. How to migrate the system to a solid state drive using Partition Assistant
1. We first open the Partition Assistant Professional Edition software. After entering the main interface, we click the "Migrate System to SSD" option in the list on the left side of the interface. Then the prompt box in the picture below appears, we click Next.

2. Next, enter the disk space selection interface. In the options below, we need to select unallocated space. After selecting, we click Next at the bottom of the interface.

3. Enter the partition size adjustment interface. We can set the size, space, location and other information of the partition in the interface. If you don’t know how to set it up, just follow the default settings and click Next directly at the bottom of the interface.

4. Next enter the boot operating system interface, as shown in the figure below. We need to read the precautions in the interface, and then click Finish below to return to the main interface of the Partition Assistant Professional Edition software.

5. After returning to the main interface of the Partition Assistant Professional Edition software, as shown in the figure below, we can see the operations waiting to be executed in the interface. Here we can modify, save, etc. After the settings are completed, we click "Submit" in the upper left corner of the interface to complete the migration of the searched system according to the prompt information. Isn't it very simple? Come and try it now.

Partition Assistant FAQ
1.How to merge partitions in Partition Assistant Professional Edition?
1. We first open the Partition Assistant Professional Edition software, enter the interface as shown below, select the partition to be merged, and then click the "Merge Partitions" option on the left side of the interface, or we directly right-click the selected partition and click the "Merge Partitions" option in the pop-up menu bar.

2. Next enter the interface to merge partitions, as shown in the figure below, we check the partitions to be merged. What needs to be noted here is that if there are multiple unallocated spaces in the interface, we can select multiple at the same time. After the selection is completed, we click OK at the bottom of the interface.

3. Return to the main interface of the Partition Assistant Professional Edition software. We click the "Submit" option at the top of the interface, and a window waiting for the execution of the operation will pop up. We click "Execute" to start merging partitions. We just need to wait patiently.

2. How to partition the Partition Assistant Professional Edition?
1. Enter the main interface of the Partition Assistant Professional Edition software. We select the unallocated space in the interface, and then click the "Create Partition" option on the left side of the interface, or right-click the selected partition and click "Create Partition" in the pop-up options.

2. Next we will enter the partition creation interface, as shown in the figure below. In the interface, we can set the drive letter, file system, space size and other information. If you are a novice, then you can follow the default options without modification. After the settings are completed, we click OK.

3. Return to the main interface of the Partition Assistant software. We click the "Submit" option at the top of the interface, and a window waiting for the execution of the operation will pop up. We click Execute to start the creation. When the execution is completed, you can see the created partition.

Comparison of versions of Partition Assistant
Partition Assistant Professional Edition: Personal computer (PC) or server, or professional users are recommended to use this professional version
Partition Assistant PE Special Edition: Integrating the partition assistant into the PE system is more convenient
No matter your computer is a laptop, desktop or server, you can use Partition Assistant Professional Edition or Green Edition.
If you need to integrate the partition assistant into your PE system, please choose the PE version.
The WinPE version indicates that it only supports running in the Windows PE environment, such as micro PE toolbox, etc.
|
Huajun editor recommends: Partition Assistant is a rare disk partitioning tool that is flexible and safe to operate. All operations can be previewed instantly in the main window of Partition Assistant. It supports running on all storage devices that can be recognized by Windows. This site also provides downloads of AOMEI Partition Assistant and Hard Disk Partition Magician. If you need them, please come to Huajun Software Park to download them. |


Useful
Useful
Useful