


Many people know through their own experience that installing an Apache server is not easy. If you want to add MySQL, PHP and Perl, it is even harder. XAMPP is an easy-to-install Apache distribution that includes MySQL, PHP and Perl.
XAMPP installation and running
Install, start
Log in as the system administrator user and extract the downloaded package to any directory on the server (cannot be placed in the Chinese name directory), for example, put it in the root directory of the c drive.
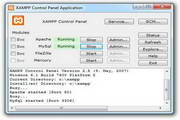
Double-click setup_xampp.bat in the running directory to initialize xampp. Then run xampp-control.exe to start or stop various modules such as apache and mysql and register them as services.
Switching between PHP 5 and PHP 4
XAMPP supports optional startup of PHP 5 and PHP 4 starting from version 1.4.7, making it easier for users to make choices based on the needs of PHP programs.
Run php-switch.bat in the root directory to enter the command window of php switching.
Switch to php4:
Enter 4 in the command window
Switch to php5:
Enter 5 in the command window
Move the entire environment elsewhere (to another directory or server)
Just run setup_xampp.bat in the root directory to enter the command window, and select "1" to re-initialize the environment.
Note: If you enable virtual host, you need to recheck whether the relative path in the virtual host configuration file is correct (if you set an absolute path, you do not need to check)
System security
XAMPP is very insecure after being installed by default. Ordinary users can access its Web management page and modify the database without any password. We only need to click the "Security" option on the left menu and follow the wizard to complete the security settings.
By default, phpmyadmin has two user names, namely pma and root. Among them, root is the administrator identity, and pma is the ordinary user identity, but both have no password by default.
The passwords for the two default users here must be set. How to set them:
(1) First set the password of the root account in "Security"
(2) Enter the phpmyadmin interface through the phpmyadmin navigation bar on the left side of the default homepage, enter the user name root and click login directly.
(3) Change the pma account password: After logging in, click the "Permissions" menu on the homepage, click the icon behind the user name "pma" on the "User List" page that appears to enter the permissions setting page, and set the password in "Change Password" on the "Edit Permissions" page. After the change, use a text editor such as WordPad or Notepad to change the pma password on line 63 of xamppphpMyAdminconfig.inc.php to the password you just set. Otherwise, a login error will occur.
Note: Only when pma does not set a password, the status of the MySQL database in the main web interface of XAMPP will be displayed as ACTIVATED!


Useful
Useful
Useful