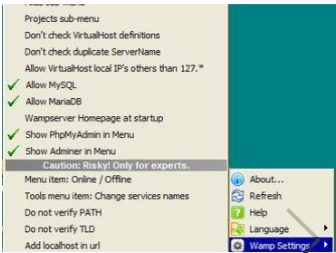
WampServer software features
1. Supports Chinese language, one-click installation, saving time and effort; anyone can easily build it;
2. Integrate Apache/MySQL/PHP/PhpMyadmin; support PHP extension and Apache’s mod_rewrit;
3. Start, restart, stop all services with one click, switch to offline state with one click, etc.
WampServer installation tutorial
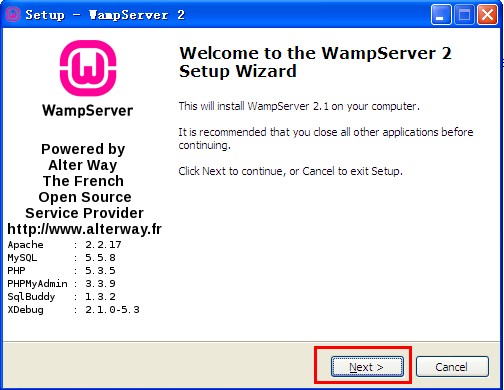
First, find the "Download Address" on this page and select any address to start downloading. Download the WampServer software package locally, double-click to unzip it, find the .exe format file and run it. As follows: In this interface, we directly click [next] to start the installation.
Because the program is an integrated package of Apache web server, PHP interpreter and MySQL database developed by the French, the entire process is due to mode installation. Start the installation step by step according to the editor's tips.
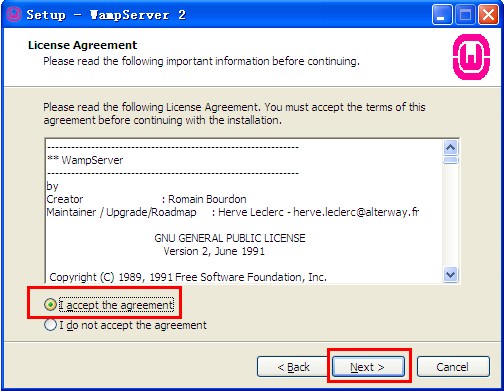
1. Click the next button to start the installation, and the following screenshot will appear: This is the installation agreement interface of the WampServer server. In this interface, we need to understand and accept the agreement before we can continue the installation.
If you agree to the agreement, select the "I accept the..." option and click [next] to continue the installation.
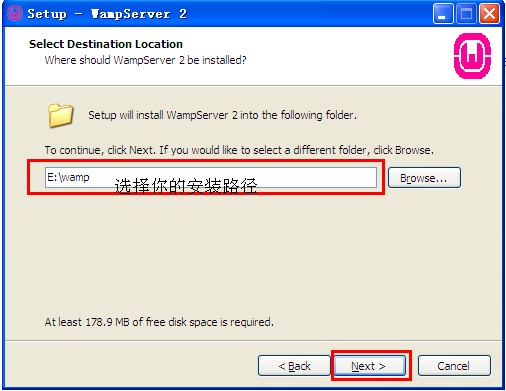
2. Continue the installation and you will enter the WampServer server installation directory setting interface: Here we need to set the specific installation directory location of the WampServer server. If you do not want to set it, please skip this step and click [next]. However, the editor does not recommend that you store files in the C drive, as doing so will slow down the system process.
If you want to set the installation location of the WampServer server, click [Browse..] to enter the setting page. After selecting, click OK and continue the [next] installation.
3. After setting the installation directory, you will enter the WampServer server add-on program selection installation interface: Please select the add-on program you want to install in the following interface and continue [next]. The following two are for creating shortcut options to quickly open WampServer next time. The former will be added to the quick launch bar, and the latter will be added to the desktop. Please feel free to choose.
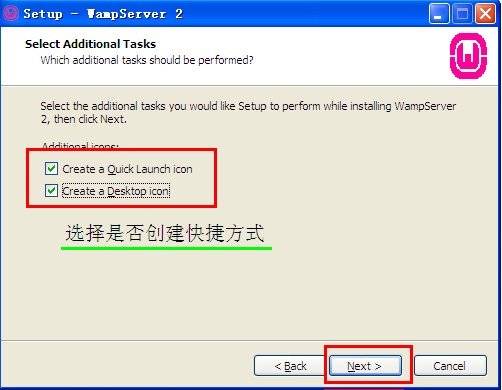
4. The next step is to enter the WampServer server installation information confirmation page. The following screenshots are all the WampServer service installation information previously set. You only need to confirm whether there are errors and click [Install] to install. If your setting information is incorrect, you can select [back] to modify it.
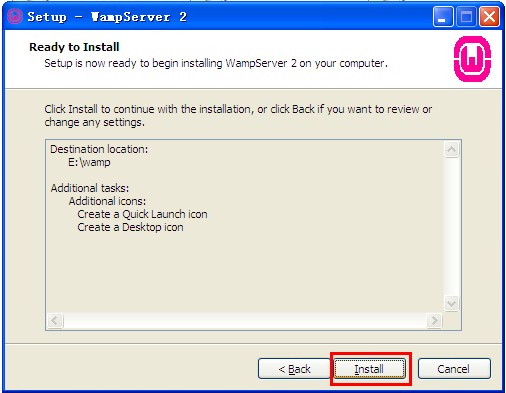
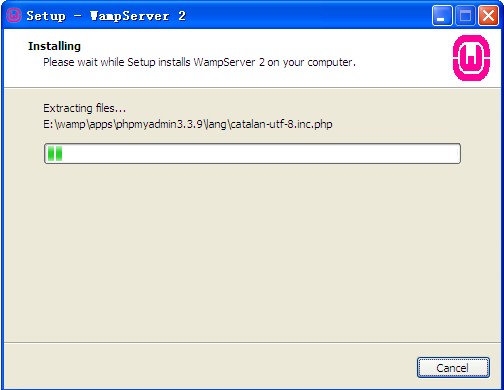
5. After the information is confirmed, enter the installation progress bar interface of the WampServer server: the only thing we need to do here is to wait for it to complete its own installation.
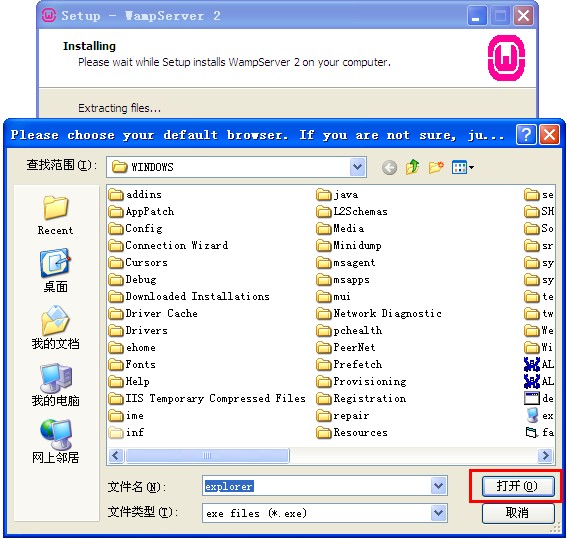
6. If the following pop-up box pops up during the installation process, we need to set the default browsing tool (for example, each text can be opened by double-clicking it directly because the computer has the default opening program for it). So when the following screenshot appears, we also need to set the default browsing tool of the program. Explorer.exe will be selected by default. This is the browser of Windows. You can select it and click the [Open] button.
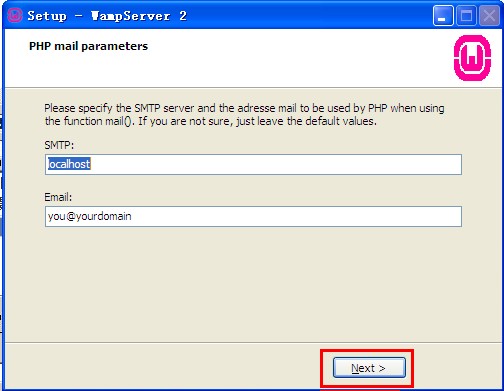
7. Then you will enter the following screenshot: We need to enter a valid SMTP server window and email address information according to the prompts. If you feel it is not necessary, you can directly click [next] to continue the installation.
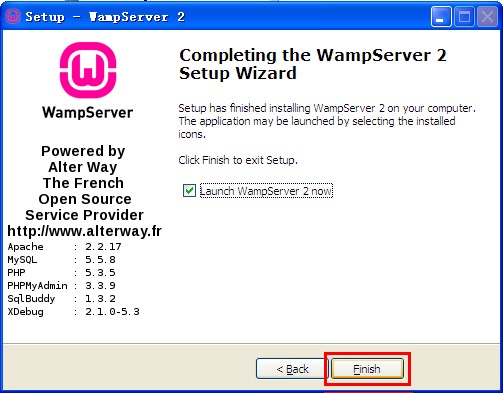
8. Finally, our WampServer server is finally installed. You can directly click [Finish] to close the interface and start using it. If you want to run the WampServer server directly, you can also check "Launch WampServer.." and then click finish to run WampServer directly.
wampserver configuration tutorial:
1. Follow the installation steps here and continue sharing. If your WampServer installation is completed normally, there will be a mark like this in the lower right corner of the computer, as shown below:
 ,
,
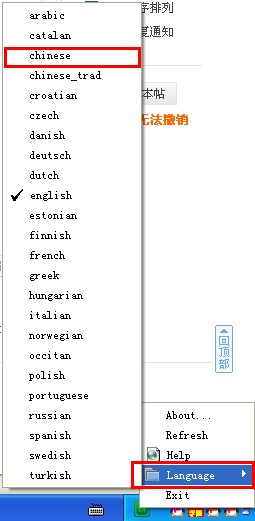
You select it, right-click, and then select Language-Chinese to set English as your own language. As follows:
2. The editor takes Chinese as an example. The specific effect is shown in the screenshot below:
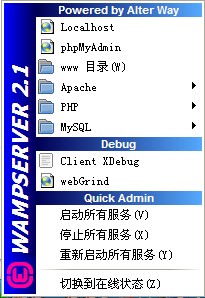
3. We continue to select the icon in the lower left corner of the WampServer computer, click the left mouse button, and select "www directory" to open the default web page folder where wampserver is installed. In fact, under normal circumstances, the web page folders we all store are not in this directory. How to remove this file directory?
1.) First open the installation directory of wampserver, then select the [script] directory to open config.inc.php.
2.) Find "$wwwDir = $c_installDir.'/www';" in the document and then change it to the target path you want.
3.) Example: $wwwDir = ‘D:/website’; D:website here is your target path. Remember that the "" representing the path under Windows must be changed to "/" here. Restart WampServer to see the effect of the change. (Note: What is modified here is only a link on wampserver. <It is not recommended that you change it unless there is a special need>. The real Apache directory does not belong here. Please don’t worry and continue reading.)
MySQL and PhpMyAdmin configuration
Because there is no step to set a password when configuring WampServer, for security reasons, Huajun editor will share with you the tips for setting a password for the WampServer server.
1. First, we select "phpMyAdmin" and left-click to enter the phpMyAdmin management page. Enter and select the [Permissions] item according to the prompts in Figure 1 below, and then click on the location of the villain as shown in Figure 2.
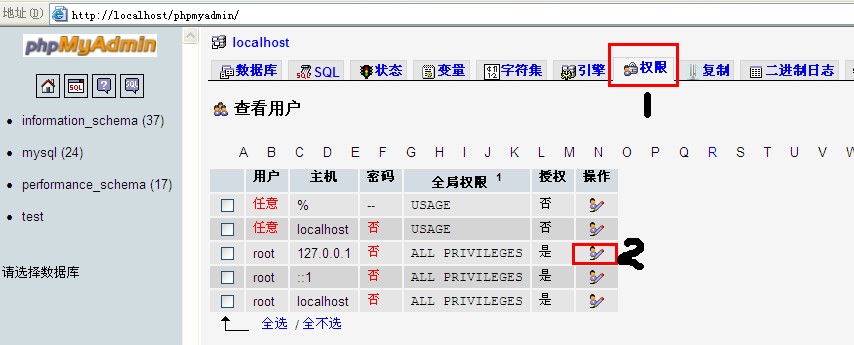
2. Click to enter the following screenshot interface: Here we directly select [Password] according to the prompts and enter your encryption password, refer to Figure 1. Here we can also set the password encryption method: MySQL4.1+ or compatible with MySQL4.0, choose according to your needs. Then click on Figure 2 to start execution. After setting the password, return to the position in the picture above and check whether "No" changes to "Yes".
Tips: 1.) Because you need to set it yourself, some friends may not be willing, then you can also choose an automatically generated password and click [Generate] to generate the password. Remember that the generated password does not conform to the regularity of your memory, so you must keep the password well. Forgetting the password is very troublesome.
2.)

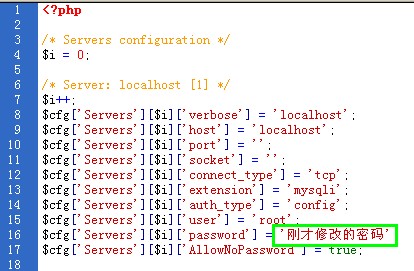
3. After completing the above settings, you can restart the MySQL service and refresh the page, but the following error will appear. How to solve it? This is because we changed the password of the current MySQL database but did not change the password for communication between phpMyAdmin and MySQL.

You can find the installation directory of wampserver and open "wampappsphpmyadmin3.3.9" → "config.inc.php" → "$cfg['Servers'][$i]['password'] = '';", then enter the password you set before in the last single quote (‘’) and save it (Ctrl+ s). Go back to the phpMyAdmin page and execute the refresh function, and the above error will not occur.
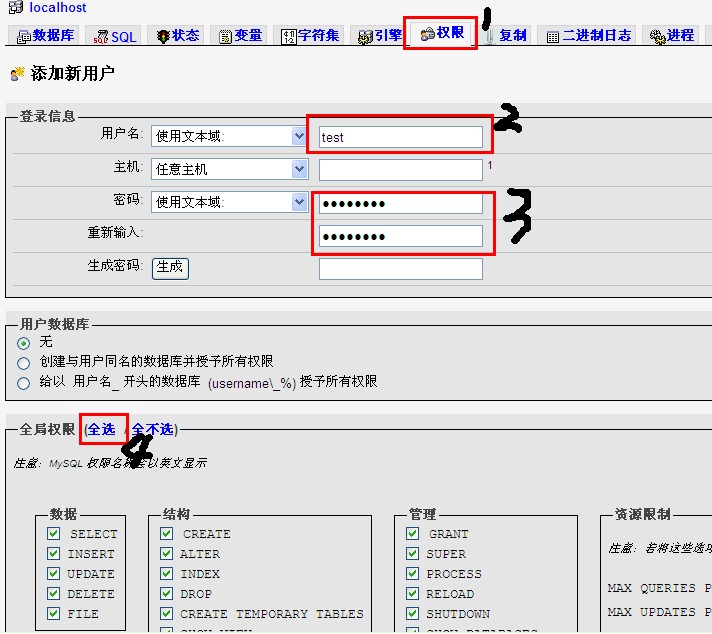
4. After all the above configurations are completed, you need to create the required users and their corresponding databases in the MySQL database. The setting method also requires clicking [Permissions] and then adding a new user according to the selection in the figure, and setting the user name and password in order to grant management permissions to a single database. Reference is as follows: After setting the information, click the [Execute] button to create it.
Apache configuration
The following are some complete information settings for the apache configuration.
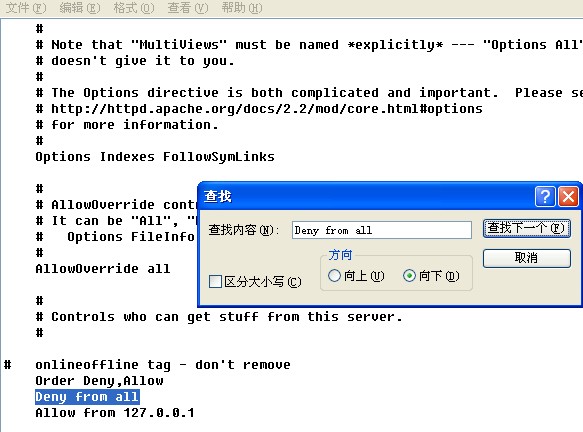
1. Situation 1: If you try to access the configured WampServer server through the external network, will there be abnormal prompts such as permissions? That's because our current setting is to support 127.0.0.1 access (that is, this machine). You need to find Apache-httpd.conf, and then open the following interface. Find "Deny from all" and "AllowOverride None" respectively (you can search with Ctrl+f, or at about line 234). Delete "Deny from all" and change "Allow from 127.0.0.1" to "Allow from all" and "AllowOverride None" are changed to "AllowOverride All" (approximately between lines 190 and 225).
Tip: Modifying "AllowOverride None" is only for those who use the URL rewriting function, otherwise the modification will only reduce the security of Apache.
3. The URL rewriting function is turned on. You can skip this step if you feel it is not necessary.
1.) Find the httpd.conf file and open it according to the previous step.
2.) Find #LoadModule rewrite_module modules/mod_rewrite.so and remove the "#" symbol, save and restart the apache service.
4. There is another way to change the path pointed by wampserver's "www directory": Find the httpd.conf file and find "DocumentRoot" (you can search with ctrl+f) and "DocumentRoot" at about line 178
Configuring PHP - Important
The configuration of PHP is relatively simple, just simply modify some basic settings. Start by clicking on the icon in the lower right corner of WampServer.
Select PHP—php.ini and find these three places: short_open_tag = Off (whether to allow the use of the abbreviated form of the PHP code start tag ( ). );
memory_limit = 128M (large); upload_max_filesize = 2M (small), here it needs to be changed to on, otherwise many PHP programs will not run. The last two items can be changed according to your actual needs.
wampserver FAQ
How to solve the problem of wampserver80 port occupation
Method one:
1. Find the icon in the lower right corner of the WampServer desktop, right-click the mouse, click [Tools] in the pop-up options, and select [Test Port 80]. This is to see which program is occupying port 80.
2. Then close the program. Usually this solves the problem, but what if the program occupying port 80 is a system program? Forced shutdown is always unsafe. Then we have to use another method - change the wamp default port
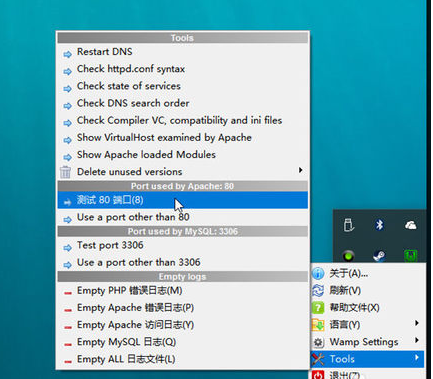
Method two:
1. Find the WampServer icon, right-click the menu [tools] option [use a port other than 80].
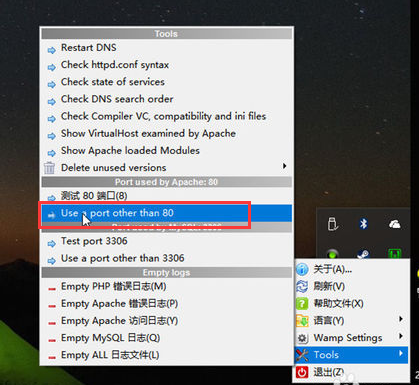
2. Enter the port you want in the pop-up window and click [ok]. Wamp will automatically restart the service. To be on the safe side, it is recommended to change it to 8000 or later. For example: 8081.
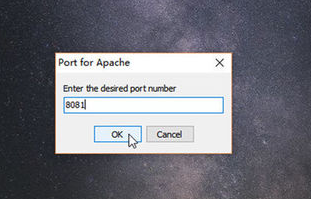
Note: If you have changed it before, you may use a port other than 80 where it will not be 80 but other values, but the method is the same, just click in and change it and click [OK].
How to import sql files from MySQL in WampServer
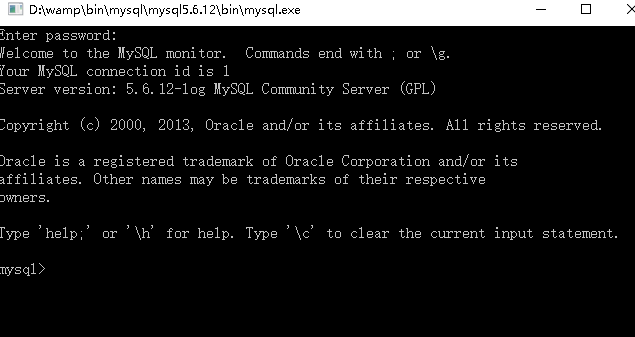
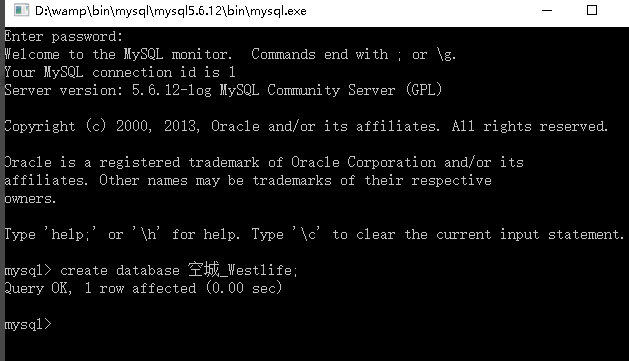
1. Open WampServer and select MySQL-MySQL console in sequence. The default password for MySQL in WampServer is empty. We directly press the Enter key to enter the MySQL command line interface.
2. Create a database and enter "create database database name;" to complete the creation of the database. The one created by the editor is "create database empty city_Westlife;", you can create it yourself.
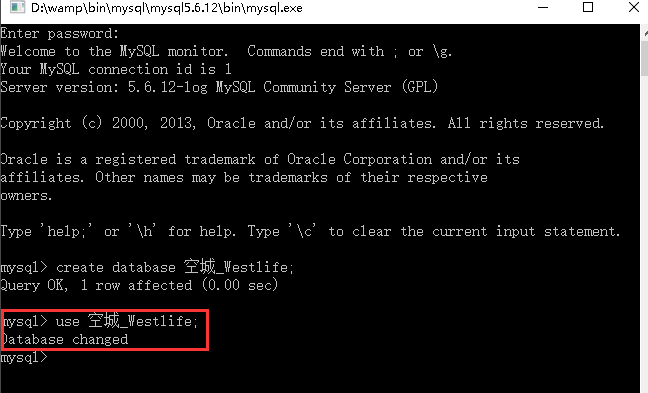
3. Enter "use database name;" to switch to this database.
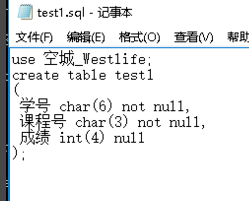
4. Find the sql file you want to import and remember the path. You can also use Notepad to edit a file with the suffix sql. The syntax is sql syntax.
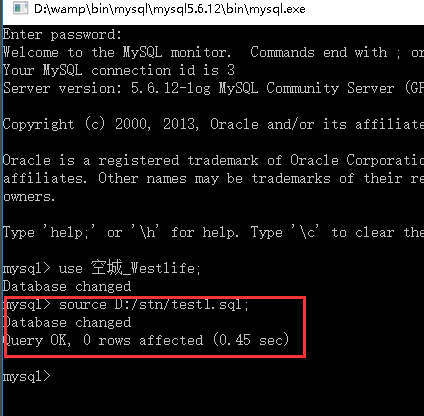
5. Enter "source drive letter:/path to your sql file;"
WampServer is an integrated software package of Apache web server, PHP interpreter and MySQL database developed by the French. This eliminates the need for developers to spend time on tedious environment configuration processes, freeing up more energy for development.
WampServer is the Windows Apache Mysql PHP integrated installation environment, which is the server software for apache, php and mysql under the Windows operating system.
WampServer 64-bit changelog:
1. Sweep the bug out and carry it out to the end
2. The most stable version ever
|
Huajun editor recommends: Huajun editor recommends to you: WampServer environment integration software. Using WampServer server environment integration software can avoid tedious configuration and installation processes and save us time. WampServer 64-bit is a good software. If you are interested, please download it and use it. I believe you will like it. In addition, the editor of Huajun has also collected and compiled other environment integration software for you to choose and download, such as: Python integrated development environment, X2 integrated PHP environment installation package, etc. |




Useful
Useful
Useful