


Keil uVision function introduction:
Fully supports Cortex-R4, ARM7, and ARM9 devices of the Cortex-M series
Industry-leading ARMC/C++ compilation tool chain
μVision4IDE, debugger and simulation environment
KEILRTX’s deterministic, small footprint, real-time operating system (source code)
The TCP/IP network suite provides a variety of protocols and applications
USB device and USB host stacks provide standard driver classes
ULINKpro enables instant analysis of every executed Cortex-M instruction on a running application and records
Complete execution code coverage information about the program
Execute profilers and performance analyzers to optimize solutions
Numerous example projects help you quickly become familiar with MDK-ARM’s powerful, built-in features
CMSIS Cortex Microcontoller software interface standard compatible
Keil uVision FAQ:
1. When commenting in keil4, why can't I enter Chinese characters? They are all boxes?
The processing method: Edit->Configuration, click the Colors&Fonts tab, select EditorCFiles in the Window list, select the font Courier on the right, UsecolorinComments cannot be checked.
After completing the above operations, let me compare before and after:
The display effect is as follows:
1. Before operation:

If the black line in the following annotation is a box, the operation is the same, but the font must be changed appropriately (eg: Song Dynasty or New Song Dynasty will work).
2. Display effect after operation:

Through the display, we can see intuitively that the text in the annotation has been clearly displayed.
2. Change the keyword color:
Method: Edit->Con
Keil uVision usage tips:
1. Installation of experimental simulation board
These two simulation experiment boards are actually two dll files, named ledkey.dll and simboard.dll respectively. During installation, you only need to copy these two or one file to the c51bin folder of the keil software as needed.

2. Use of experimental simulation board
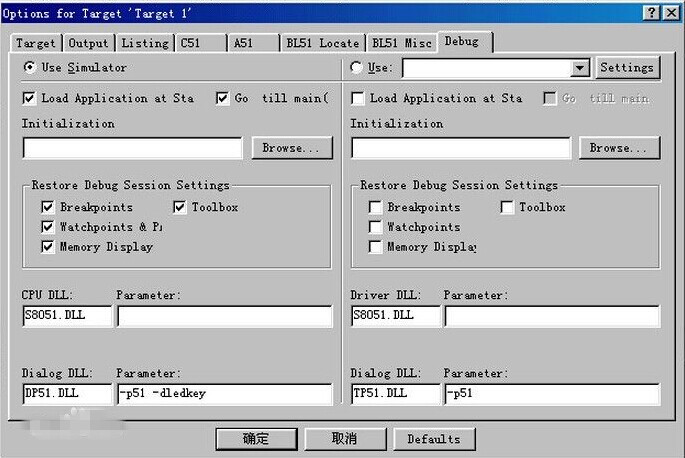
To use the simulation board, you must set up the project. The setting method is to click Project->OptionforTarget‘Target1’ to open the dialog box, then select the Debug tab, and enter -d file name in the edit box after Dialog:Parameter:. For example, if you want to use ledkey.dll (the first simulation board) for debugging, enter -dl
3. Instance debugging
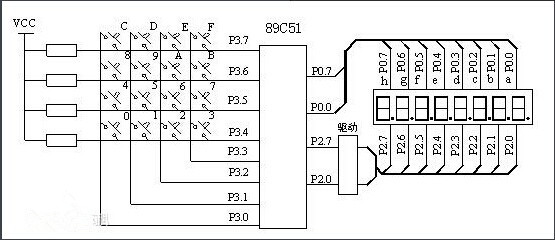
The following takes a slightly complex program as an example to illustrate the use of keyboard and LED display experimental simulation boards. What this program implements is a controllable flowing water lamp. The key connected to P3.2 is the start key. Press this key to make the lights start to flow (from top to bottom). The key connected to P3.3 is the stop key. Press this key to stop the flow and all lights will be dark. The key connected to P3.4 is the up key. Press this key to make the lights flow from top to bottom. The key connected to P3.5 is the down key. Press this key to make the lights flow from bottom to top.


Useful
Useful
Useful