


Sole desktop search software features
1. Search various files on your computer in seconds;
2. Support full-text search in file name and content;
3. Support Chinese and English word segmentation;
4. Supports the use of iFilter plug-ins to expand the function of searching for the content of any type of file;
5.Support search syntax , suitable for both ordinary users and professional searchers. Through the search syntax, you can specify the search fields (fields include filename, time, filetype, size, path and content), you can also use AND, OR, NOT to perform corresponding logical combinations of keywords and then conduct advanced searches;
6. Sort search results;
7.Support English stemming and search;
8. Fully compatible with 32-bit and 64-bit operating systems of Windows XP and above;
9. By default, the background thread is only used to scan and crawl the index when the computer is idle, occupying less or even no CPU when you are using the computer for work;
10. The index is updated in real time and modified files can be searched immediately.
Sole desktop search software installation
Download the installation package of the search program, then run the Setup.exe (or SoouleDesktopSearch.2.1.exe) file and follow the prompts to install.
We ensure that the search software you download from the official website is safe. When downloading and installing, software such as 360 or Computer Manager may prompt that this software contains Trojans or risks, please ignore it. You can also temporarily exit such software to avoid disrupting the installation.
Sole desktop search software can be installed on desktop operating systems such as Windows XP/Vista/7/8/10 and Windows Server 2003 and above server operating systems, and because the software is compiled to apply to any CPU (Any CUP) executable file type, so the same installation package supports running in 32-bit or 64-bit Windows.
Sole desktop search tutorial
By default, after the software is installed or the computer is started, the Sole Desktop Search icon will be displayed on the right side of the taskbar below the Windows desktop, as shown in Figure 5-1. When you left-click the icon, the main form of the search software will pop up (as shown in Figure 5-2). When you right-click the icon, the function menu of the software will pop up. If there is no Sole icon on the taskbar, you can Search the Sole Desktop program group in the Start menu or run the program from the Sole icon on the desktop.

Figure 5-1 Sole Desktop Search icon on the Windows desktop taskbar

Figure 5-2 Sole desktop search main form and input box
To perform a search operation, just enter the keyword directly in the keyword input box (position A in Figure 5-2). Keywords originate from the English "keywords", which specifically refers to the vocabulary used by individual media when making and using indexes. It is a vocabulary in library science. Keyword search is one of the main methods of search indexing, which is the specific name of the document that the user wants to know.
After installing the search software for the first time, the software is in the normal search state. If the software is in the advanced search state, you can click the search button in the upper right corner of the main interface of the search software (position B in Figure 5-2) to the right of the vertical line. At this time, the software will pop up a selection menu. You can switch the software to the normal search state by selecting the "Normal Search" menu item. When you exit the program, the search status (normal or advanced) is saved, i.e. the search status will be restored the next time you run the program.
In addition to ordinary searches, you can also perform complex search operations by using search syntax (see the official website for details).
Sole Desktop Search FAQ
1) After installing "Sole Desktop Search", how long does it take to search? How long does it take to search all files on the computer?
After the installation is complete, you can search immediately, but only some documents can be found at this time. Because after the installation is completed, a full-text index of all documents in the computer (including file names, text content of files, modification time and size, etc.) is required, so it will take a certain amount of time to complete this operation. Under normal circumstances, about 6,000 to 20,000 documents can be indexed per minute. Depending on the performance of your computer and the number of documents on your computer, it may take dozens of minutes to several hours before you can search all the documents on your computer. Only one complete scan and index operation is required, so you can immediately index all of your computer's documents every time you turn on the computer or restart the program.
2) Why does the indexing operation sometimes "stop and go"?
By default, "Sole Desktop Search" only performs scanning and indexing operations when you are not using your computer (without any keystrokes or mouse operations), so as not to occupy or reduce the use of CPU resources, so that there will be no interference or impact on your use of the computer. If you want to complete the index scanning operation faster, you can right-click the "Sola" icon on the taskbar, select "Index Management", and then cancel "Idle Indexing".
3) Why does it not start when the computer is turned on even though it is set to “start automatically at boot”?
For Windows For operating systems of version 10 and above, even if the Sole desktop search program is set to "automatically start at boot", the operating system restricts the automatic startup of the program in user account control, so the corresponding setting needs to be disabled. There are two methods to open this setting, as follows:
Method 1:
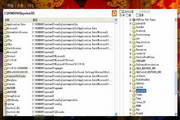
Click Start in the lower left corner of the Windows desktop, select "Administrative Tools" -> "Local Security Policy" (Figure 8-1) -> "Security Settings" -> "Local Policy" -> "Security Options", then set the setting of "User Account Control: Run all administrators in administrator approval mode" (Figure 8-2) to "Disabled" and then restart the computer.
Method 2:
Press Windows key + R, then enter "gpedit.msc" and press Enter, select "Local Group Policy Editor" -> "Windows Settings" -> "Security Settings" -> "Local Policy" -> "Security Options" (Figure 8-1), then set the setting of "User Account Control: Run all administrators in administrator approval mode" (Figure 8-2) to "Disabled" and restart the computer.

Figure 8-1 Local security policy

Figure 8-2 "Run all administrators in administrator approval mode" settings
Overall interface
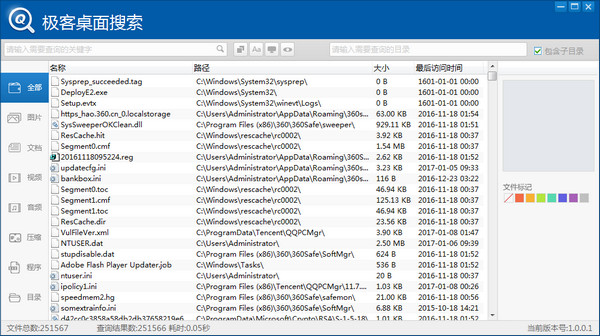
The search interface of the software is fresh and concise, as shown in Figure 4-1 below:
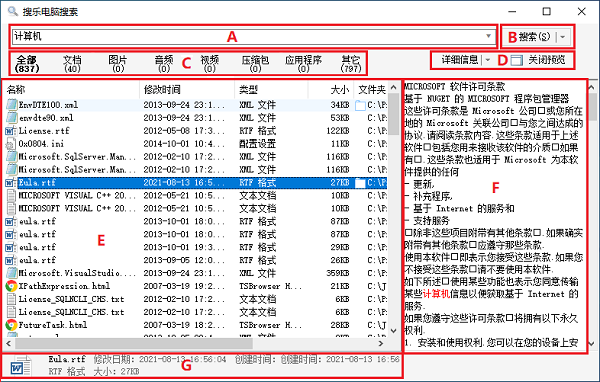
Figure 4-1 Search software main interface
A. Search input box. When you enter keywords, the software will automatically search immediately and display the results in the display list (E).
B. Search button. Although clicking the Search button will perform a search, you usually don't need to click it. If you click the right side of the vertical line in the button, a menu will pop up, and you can select the "Normal Search" or "Advanced Search" menu item to change the settings. If you select "Advanced Search", the input bar for advanced search will appear on the form (shown as H in Figure 4-2); if you select "Normal Search", the input bar for advanced search will disappear from the form.
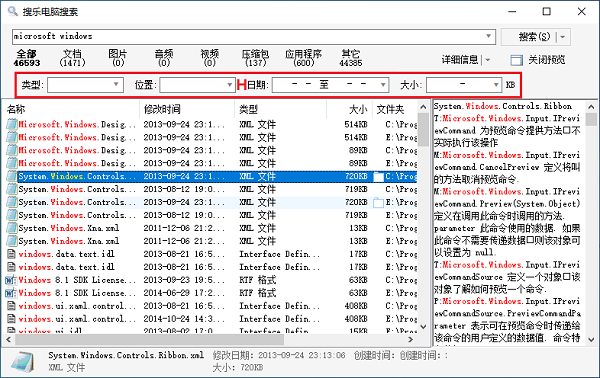
Figure 4-2 Search software main interface in advanced search state
C. Document category button and corresponding number of result items. After the software is started, the default category is "All". When the corresponding category button is clicked, the system will re-execute the search operation and display the documents that meet the criteria in the result list. (E).
D. Style switching and selection of the result list (E) view, and turning on and off the preview function. When you click the left side of the vertical line in the view category button, the view style will switch between details, tiles, large icons, small icons, and list; when you click the right side of the vertical line in the view category button, a selection menu will pop up, and you can directly select a view style through the menu items. When the Close Preview or Show Preview button is clicked, the preview area in the form (F) will be closed or reopened.
E. Result list area. In the "Detailed List" view state, there are name, modification time, type, size and folder columns in the result list. Click the column title (such as "Name") to sort the search results by the content of this column; each time you click, you will switch between ascending order, descending order and original order (according to the relevance of the document). No matter which view state you are in, when you click the scroll bar of the result list with the mouse (or drag the scroll bar down or right with the mouse), or press the page down key on the keyboard (Page Down), the result list will automatically load more subsequent result items (or document items) when necessary. When a document item in the list is selected, in the preview area (F) The text information of the corresponding document will be displayed (when preview is turned on), and in the status bar (G), the detailed information of the currently selected document item will be displayed. The font and color of the result items can be changed in the system settings of the software.
F. Preview area. When preview is on, displays information about the document item currently selected in the results list. Relevant search keywords are displayed in a highlighted manner ("red" by default). But if the result item cannot be previewed, the words "No Preview" will be displayed. The font and color of the preview area can be changed in the system settings of the software.
G. Status bar. Relevant information will be automatically displayed based on the running status of the software. When the search input box When (A) is empty, the status bar displays how many documents are currently available for search; when a keyword is entered, the status bar displays how many related documents are found; when a result item is selected in the result list, the status bar displays the detailed information of the result item.
H. Advanced search options. When the software is in advanced search state (see search button for details) (B)) This option is shown and turned off when in normal search mode. You can search for document type, location, date, and size by selection or manual entry. For detailed instructions on using the advanced search options, see Advanced Search .
Sole desktop search tutorial
By default, after the software is installed or the computer is started, the Sole Desktop Search icon will be displayed on the right side of the taskbar below the Windows desktop, as shown in Figure 5-1. When you left-click the icon, the main form of the search software will pop up (as shown in Figure 5-2). When you right-click the icon, the function menu of the software will pop up. If there is no Sole icon on the taskbar, you can Search the Sole Desktop program group in the Start menu or run the program from the Sole icon on the desktop.

Figure 5-1 Sole Desktop Search icon on the Windows desktop taskbar
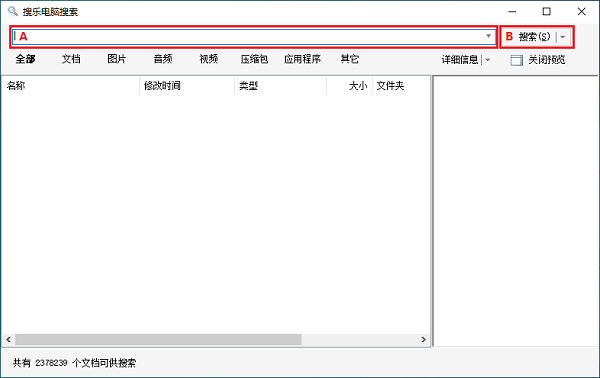
Figure 5-2 Sole desktop search main form and input box
Because "Automatically perform search when entering keywords" is turned on by default in the system settings, you can automatically obtain search results by directly entering keywords in the keyword input box (position A in Figure 5-2); if you have disabled "Automatically perform searches when entering keywords" in the system settings, you need to press the Enter key or click the <Search> button after entering the keywords to obtain search results. Keywords originate from the English "keywords", which specifically refers to the vocabulary used by individual media when making and using indexes. It is a vocabulary in library science. Keyword search is one of the main methods of search indexing, which is the specific name of the document that the user wants to know.
After installing the search software for the first time, the software is in the normal search state. If the software is in the advanced search state, you can click the search button in the upper right corner of the main interface of the search software (position B in Figure 5-2) to the right of the vertical line. At this time, the software will pop up a selection menu. You can switch the software to the normal search state by selecting the "Normal Search" menu item. When you exit the program, the search status (normal or advanced) is saved, i.e. the search status will be restored the next time you run the program.
In addition to ordinary searches, you can also perform complex search operations by using search syntax.
Note: Delete the "Sole Desktop Search FAQ" because these are redundant before users download and install;
Sole desktop search update log
1. Optimized some functions;
2. Fixed multiple known bugs.
Huajun editor recommends:
Sole Desktop Search has always been a commonly used search engine software for most friends. It has such a dominant position in the minds of netizens. The editor of Huajun Software Park recommends users to download Sole Desktop Search. Come and download it. In addition, there areBaidu+,Feiyang p2p seed searcher,Search Pass,Qisoutong,Seed search artifact cloud on-demand versionAvailable for download.


Useful
Useful
Useful