Hot search terms: 360 Security Guard Office365 360 browser WPS Office iQiyi Huawei Cloud Market Tencent Cloud Store
Hot search terms: 360 Security Guard Office365 360 browser WPS Office iQiyi Huawei Cloud Market Tencent Cloud Store

video editing Storage: 4.8GB Time: 2021-11-12
Software introduction: VideoStudio (Corel VideoStudio) is a feature-rich video editing software released by the Canadian Corel company. Videophone...
Step 1: Prepare the video. After shooting a satisfactory video with a digital camera, use the capture function of "VideoStudio" to convert it into a digital video, and then perform appropriate editing. In this way, the video film is ready, and you can start making the cast list;
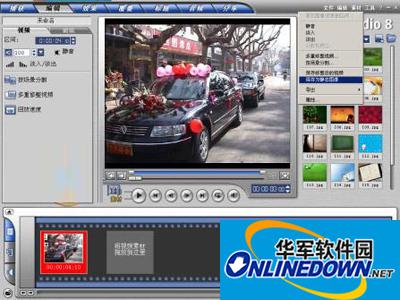
Step 2: Make the background. Capture freeze-frame images. Click "Edit" at the top of the interface, browse the edited video to find the background of the cast, click and drag the ruler of the preview bar below the preview window, and the corresponding video picture will appear in the preview window. After finding the approximate position that needs to be used as the freeze frame, you can use the "Previous Frame/Next Frame" button below to accurately locate it until you find the picture you need to freeze. At the same time, the "Time Code Display Window" also displays the corresponding time and number of frames. Of course, you can also use the last frame of the image. After finding it, select the "Save as Still Image" command in the "Material" menu, as shown in Figure 1, to add the image material to the material library. Next drag this to the editing bar;
Tutorial on making cast list with VideoStudio
Step 3: In timeline mode, drag the "Current Position" mark on the time ruler and place it to the position where the cast needs to be added (the image added above). In the preview window, you can view the video effect of the current position;
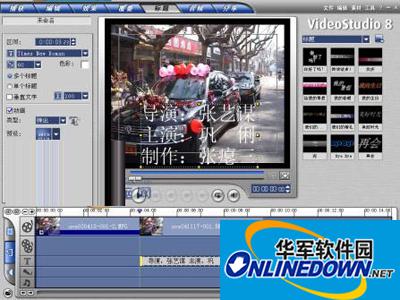
Step 4: Add content. Click the "Title" menu in the menu bar to enter the steps of adding a title. Then click the "Create or Edit Title Material" button on the options panel, enter the multi-line text that needs to be added in the preview window, and press the Enter key to enter the multi-line text. Then, just like editing in WORD, select the text whose attributes need to be changed. Select the corresponding settings button in the set font attributes to adjust the font, text size, text style, alignment, color, and line spacing of the text, as shown in Figure 2. After setting, you can see the effect in the middle preview window. It is important that text appears within this "safe area" margin, as some television formats will enlarge the image, causing the outside edges of the video footage to fall off the screen. So having the text appear in a safe area ensures that it appears on the screen;
Tutorial on making cast list with VideoStudio

 How to edit text in coreldraw - How to edit text in coreldraw
 How to cut out pictures quickly in coreldraw - How to cut out pictures quickly in coreldraw
 WPS Office 2023
 WPS Office
 Minecraft PCL2 Launcher
 WeGame
 Tencent Video
 Steam
Steam
 CS1.6 pure version
 Eggman Party
 Office 365
 What to do if there is no sound after reinstalling the computer system - Driver Wizard Tutorial
 How to switch accounts in WPS Office 2019-How to switch accounts in WPS Office 2019
 How to clear the cache of Google Chrome - How to clear the cache of Google Chrome
 How to upgrade the bootcamp driver? How to upgrade the bootcamp driver