Microsoft Word 2013 is the core word processing software in the Microsoft Office suite. It features modern interface design and deep cloud service integration as its iconic features. Users can not only quickly create professional documents through rich templates, but also use OneDrive cloud storage to achieve collaborative editing on multiple devices. Its innovative "reading mode" and real-time collaboration functions make document processing and teamwork more efficient and convenient, making it an indispensable and powerful tool in modern office scenarios. Next, let Huajun editor explain to you how to generate a document directory in word2013 and how to generate a document directory in word2013!
first step
Open the Word document where a table of contents needs to be added, and move the cursor precisely to the specified position in the document where the table of contents needs to be inserted. This position is usually at the beginning of the document, making it easier for readers to quickly browse the document structure.
Step 2
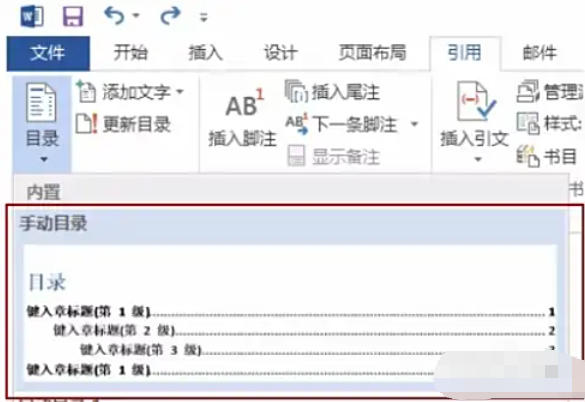
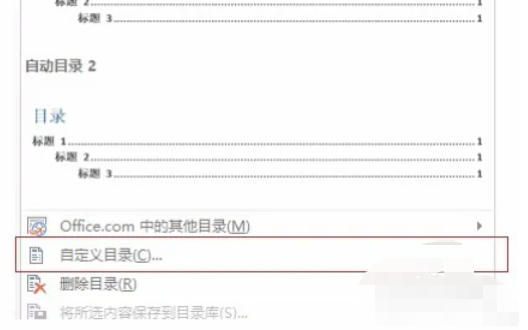
Click the "Reference" tab in the menu bar and select "Manual Catalog" in the "Table of Contents" function group. Click the "References" tab and select "Automatic Table of Contents" in the "Table of Contents" function group. Click the "Reference" tab and select "Custom Directory" in the "Directory" function group.
Step 3
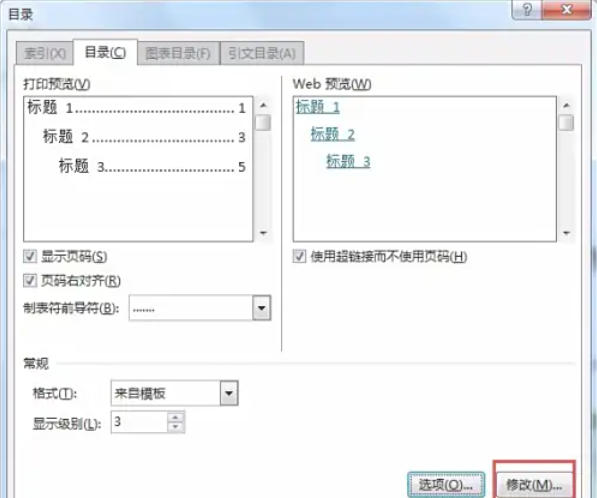
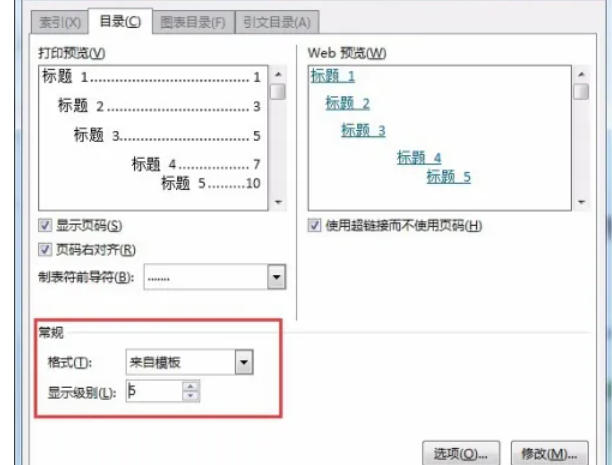
After clicking "Customize Directory", the "Directory" dialog box will pop up, where you can make various detailed settings.
Step 4
In the "General" section of the "Table of Contents" dialog box, you can use the "Display Level" value box to set the number of title levels displayed in the table of contents. For example, if set to 3, three levels of titles, Title 1, Title 2, and Title 3, will be displayed in the table of contents.
Step 5
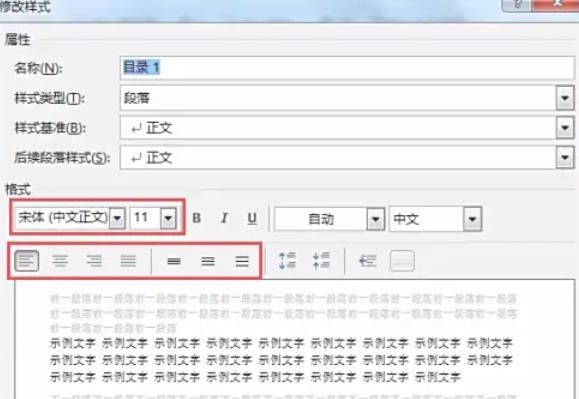
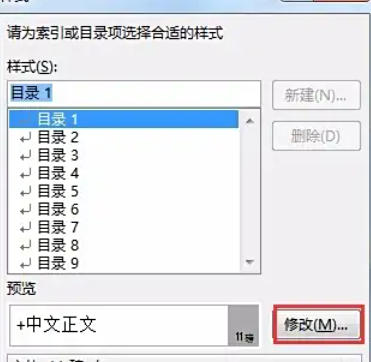
In the "Table of Contents" dialog box, click the "Modify" button to pop up the "Style" dialog box. In the "Style" list, select styles such as "Directory 1", "Directory 2" and "Directory 3" respectively, and click the "Modify" button to enter the corresponding "Modify Style" dialog box.
Step 6
After completing all customized settings, click the "OK" button in the "Table of Contents" dialog box. Word 2013 will generate a custom table of contents according to the settings and insert it at the position of the cursor.
Step 7
After the document content is modified, the page numbers or titles in the table of contents may change. In this case, the table of contents needs to be updated. Place the cursor in the directory area, right-click the mouse, and select "Update Domain" from the pop-up shortcut menu (some versions display "Update Directory").
Step 8
Update options: In the pop-up "Update Catalog" dialog box, there are two options to choose from:
Update page numbers only: Only update the page number information in the table of contents, which is suitable for situations where only the position of the document content has changed, but the title has not changed.
Update the entire table of contents: Update the title and page number information in the table of contents, which is applicable when the document title is added, deleted or modified. After selecting the appropriate options, click "OK" to complete the directory update.
The above is how the editor of Huajun compiled for you how to generate a document directory in word 2013 and how to generate a document directory in word 2013. I hope it can help you!


