Hot search terms: 360 Security Guard Office365 360 browser WPS Office iQiyi Huawei Cloud Market Tencent Cloud Store

Hot search terms: 360 Security Guard Office365 360 browser WPS Office iQiyi Huawei Cloud Market Tencent Cloud Store

image processing Storage: 1.44GB Time: 2022-04-22
Software introduction: The latest version is a three-dimensional design aid tool suitable for engineering designers. The official version of AutoCad 2020 is versatile and easy to use...
—When using AutoCAD, do you mark diameter dimensions and tolerances? The following is the operation content of AutoCAD for marking diameter dimensions and tolerances introduced by the editor. I hope it can help friends in need!
1. Draw graphics
Create a new file "Dimensional Tolerance Marking Exercise" and draw the graph as shown in the figure.

Click on Linear Dimension,

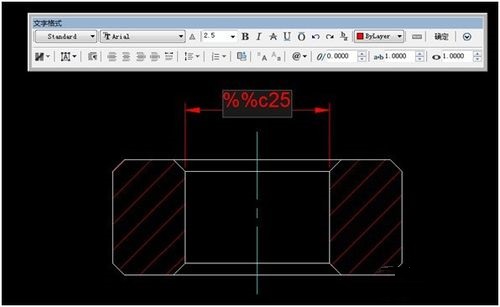
Added diameter symbol. Double-click the size 25. Open the [Text Editor] tab, then move the mouse to before 25, enter "%%c" (note that the letter c can be uppercase or lowercase), and add a diameter symbol to it.

Click the left mouse button. As shown below:

2. Mark the limit tolerance
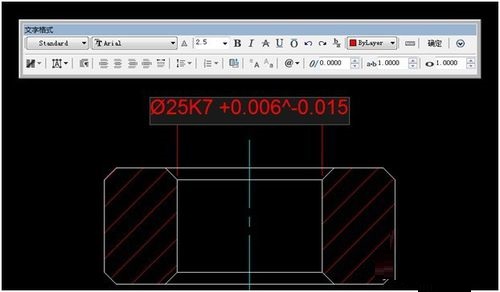
Double-click “Φ25” and enter the tolerance text. Then move the mouse to the back of 25 and enter "K7 +0.006^-0.015" in sequence.

Create dimensional tolerances. Then hold down the left mouse button and drag it backwards to select the text "+0.006^-0.015", and then click the [Stack] button "b/a" in the [Format] panel of the [Text Editor] tab.

You can create dimensional tolerances as shown in the figure:

3. Mark symmetry tolerance
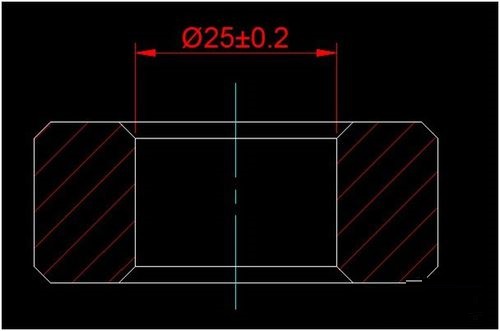
Double-click the dimensions marked in the picture above, open the [Text Editor] tab, delete the tolerance just marked, then move the mouse to the back of 25, enter "%%P0.2" (note that the letter P can be uppercase or lowercase), left-click the mouse, and mark the dimensions as shown below

以上这里为各位分享了AutoCAD标注直径尺寸和公差的图文教程。 Friends in need should hurry up and read this article.
 Top 10 list of mouse linkers: Double the efficiency of office games, get started with this magic tool in 5 minutes!
 How to download, install and register the EA platform (Rotten Orange), one article will teach you
 How to register for Google Mail - understand it all in one article - Huajun Software Park
 How to connect HP wireless printer to WiFi, one article will teach you
 Steam
Steam
 Tencent Video
 WPS Office
 iQiyi
iQiyi
 Sohu video player
 Lightning simulator
 MuMu emulator
 Eggman Party
 WPS Office 2023
 Detailed steps for renaming shape layers in Image Factory
 How to exit safe mode on Xiaomi? -How to exit safe mode in Xiaomi
 How to use Xiaomi Mobile Assistant? -Xiaomi Mobile Assistant usage tutorial
 How to force restart Xiaomi phone? -How to force restart your phone in Xiaomi
 How to set the computer shutdown timer? -Tutorial on setting up computer shutdown schedule