-
windows media encoder 9
- Size: 9.4M
- Language: Simplified Chinese
- Category: programming tools
- System:winall


Windows Media Encoder 9 is a dedicated media video encoder officially produced by Windows Microsoft. Using this Windows Media Encoder 9 can make your video encoding more convenient, Windows Media Encoder.
Software features
- New user interface and wizard
It is easier to set up and create videos to provide live or on-demand network playback. It supports multiple sources, can switch sources immediately, and can monitor data during the encoding process, such as image size, data traffic, etc.
- New coding capabilities
Supports de-interlacing, inverse telecine and screen capture, which can have better output quality, from 320*240*60fps to 640*480*30fps, and the maximum capture file can be 30GB. Supported capture devices include Winnov, ATI, Hauppauge, and USB video cameras.
- Windows Media Encoder SDK provides website developers with fully automatic encoding control, which can be controlled remotely from the network (LAN), or through API access or ASP control.
Live broadcasting of TV programs online in a local area network actually uses a Windows Media encoder to encode and broadcast the received TV signals, and then the client connects to the Windows Media encoder through Windows Media Player to watch TV programs online. Taking the implementation of this solution in Windows XP SP2 system as an example to introduce the specific implementation method.
- Greater control and flexibility
Capture content with frame-accurate control. Protect live streaming content and initiate broadcasting. Available in a variety of delivery methods, including MBR streaming and CD/DVD.
- Unparalleled audio and video quality
Regardless of whether the source file is multi-channel content or sound-only content, the audio is produced with crystal clear audio. Encode at any level, from HD quality (1080i/1080p) to low data rate screen capture, to suit whatever your requirements are. Additionally, there are fine-tuned compression features using new encoding modes.
- Scalability and automation
Extended encoder functionality. The coding process is fully automated. Includes four new utilities
How to use
First, install the Windows Media encoder on the computer with the TV card installed. The software can be downloaded for free from the Microsoft website. The installation method of the software is relatively simple and will not be described in detail here. The following description will focus on how to configure the Windows Media encoder. The specific steps are as follows:
- Step 1
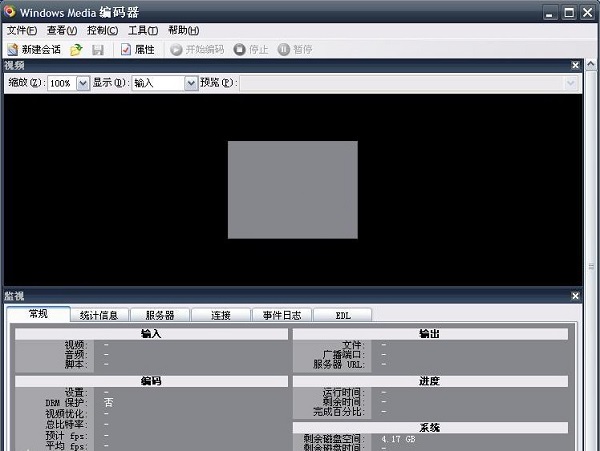
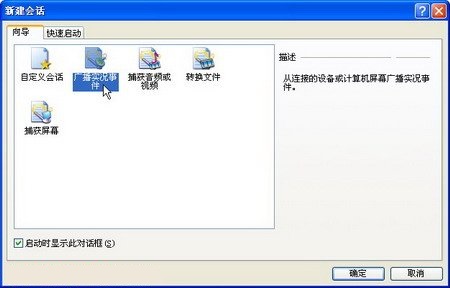
Click the "All Programs" → Windows Media → "Windows Media Encoder" menu item in the Start menu to run Windows Media Encoder. Select the "Broadcast Live Event" option in the "New Session" dialog box that opens automatically, and click the "OK" button.
- Step 2
Enter the "New Session Wizard" and select the currently used TV card and sound card in the "Video" and "Audio" device lists respectively. The TV card used in this example is TV Capture Card WDM Video Captur, and the sound card is SigmaTel Audio integrated on the motherboard. After setting, click the "Next" button.
- Step 3
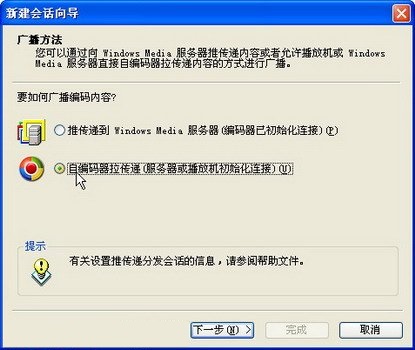
In the "Broadcast Method" dialog box that opens, select the "Autoencoder pull pass (server or player initializes connection)" radio button, and click the "Next" button.
- Step 4
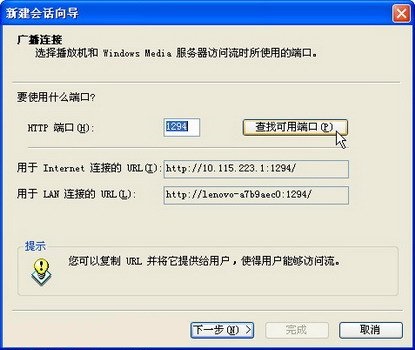
Open the "Broadcast Connection" dialog box. In the "URL for Internet Connection" and "URL for LAN Connection" edit boxes, display the addresses used when connecting to the Windows Media encoder through the Internet and LAN respectively. Just write down the first address. In addition, you can click the "Find Available Ports" button to change the default port number, which can improve the security factor. After setting, click the "Next" button.
- Step 5
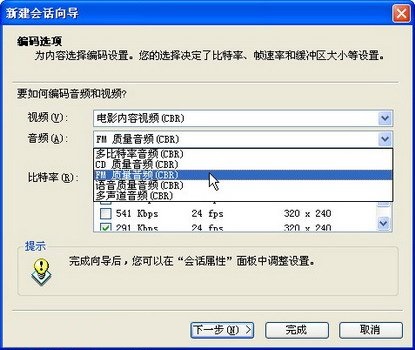
Used to set the encoding quality of audio and video in the "Encoding Options" dialog box that opens. Click the "Video" drop-down triangle button and select the "Cinematic Content Video (CBR)" option in the drop-down list. Then click the drop-down triangle button on the right side of "Audio" and select the "FM Quality Audio (CBR)" option in the list. After setting, click the "Finish" button, and the configuration of the Windows Media encoder is successfully completed.
Version: v9.0(32&64) Chinese version | Update time: 2024-12-30
Similar recommendations


Latest updates


How to set up automatic saving in autocad-How to set up automatic saving in autocad
How to export pdf from autocad-How to export pdf from autocad
How to draw dotted lines in autocad-How to draw dotted lines in autocad
How to enable hardware acceleration in autocad-How to enable hardware acceleration in autocad
How to make curved text in coreldraw - How to make curved text in coreldraw
How to make special effect fonts in coreldraw - How to make special effect fonts in coreldraw
How to split text in coreldraw - How to split text in coreldraw
How does coreldraw manage multi-page typesetting - How does coreldraw manage multi-page typesetting?
How to create perspective effect in coreldraw - How to create perspective effect in coreldraw
windows media encoder 9 review
-
1st floor Huajun netizen 2021-12-09 14:09:44windows media encoder 9 is very useful, thank you! !
-
2nd floor Huajun netizen 2018-01-21 05:34:58The interface design of windows media encoder 9 is very easy to use and has rich functions. I highly recommend it!
-
3rd floor Huajun netizen 2022-02-16 23:22:25The overall feeling of windows media encoder 9 is good, I am quite satisfied, the installation and operation are very smooth! It went very smoothly following the installation step-by-step guide!
Recommended products


- Diablo game tool collection
- Group purchasing software collection area
- p2p seed search artifact download-P2P seed search artifact special topic
- adobe software encyclopedia - adobe full range of software downloads - adobe software downloads
- Safe Internet Encyclopedia
- Browser PC version download-browser download collection
- Diablo 3 game collection
- Anxin Quote Software
- Which Key Wizard software is better? Key Wizard software collection