Hot search terms: 360 Security Guard Office365 360 browser WPS Office iQiyi Huawei Cloud Market Tencent Cloud Store
Hot search terms: 360 Security Guard Office365 360 browser WPS Office iQiyi Huawei Cloud Market Tencent Cloud Store

Office software Storage: 248MB Time: 2020-06-05
Software introduction: WPS is a very easy-to-use office software launched by Kingsoft. WPS software is compact and quick to install, takes up very little memory, and starts up quickly. It includes...
Recently, many netizens have said that they do not know how to add dotted borders when operating WPS documents. For this reason, today the editor has specially shared with you the steps to add dotted borders in WPS. Friends in need should not miss it.
1. Open the document where you want to set a dotted border in WPS.
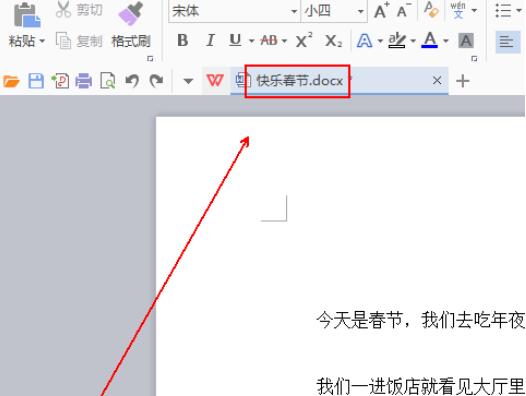
2. Select the text content that you want to set a dotted border.

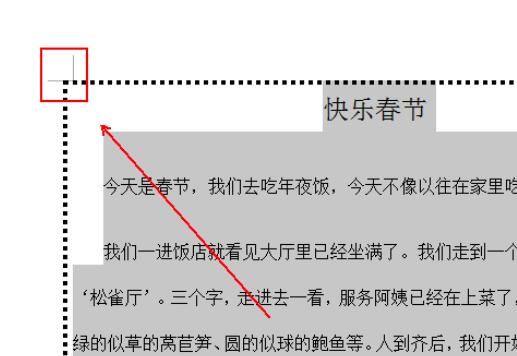
3. In the upper left corner of the wps text, click the inverted triangle next to "wps text".

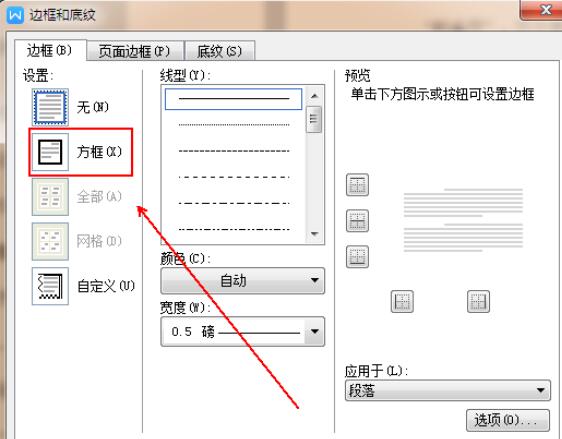
4. In the pop-up menu list, click the "Format"-"Borders and Shading" option.

5. In the "Borders and Shading" window, click the "Box" option under the "Borders" tab.
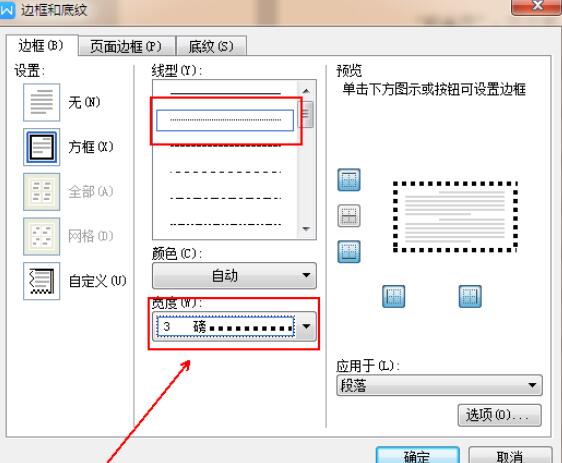
6. Set the line type to dashed and the width to 3 points.
7. Click the "OK" button below.
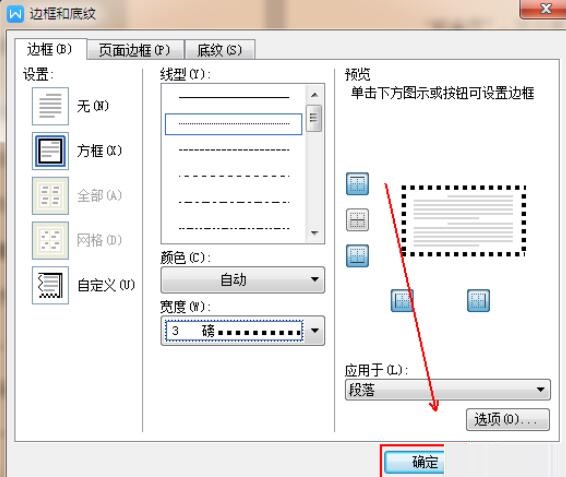
8. The final result is as shown in the figure.
Dear friends, after reading the wonderful content above, you all know the steps to add a dotted border in WPS!

 How does coreldraw generate barcodes - How does coreldraw generate barcodes
How to correct pictures with coreldraw - How to correct pictures with coreldraw
 How to split cells in coreldraw - How to split cells in coreldraw
 How to center the page in coreldraw - How to center the page in coreldraw
 How to customize symbols in coreldraw - How to customize symbols in coreldraw
 Sohu video player
 WPS Office
 Tencent Video
 Lightning simulator
 MuMu emulator
 iQiyi
iQiyi
 Eggman Party
 WPS Office 2023
 Minecraft PCL2 Launcher
 What to do if there is no sound after reinstalling the computer system - Driver Wizard Tutorial
 How to switch accounts in WPS Office 2019-How to switch accounts in WPS Office 2019
 How to clear the cache of Google Chrome - How to clear the cache of Google Chrome
 How to upgrade the bootcamp driver? How to upgrade the bootcamp driver