
Hot search terms: 360 Security Guard Office365 360 browser WPS Office iQiyi Huawei Cloud Market Tencent Cloud Store

Hot search terms: 360 Security Guard Office365 360 browser WPS Office iQiyi Huawei Cloud Market Tencent Cloud Store

Assisted design Storage: 85.8M Time: 2017-06-23
Software introduction: Axure RP 8.0 (webpage prototyping tool) is a must-have interactive prototyping software for product managers, which can efficiently produce product prototypes...
In order to make the tree menu more beautiful, you can add beautiful icons. So how does Axure RP 8 create a tree menu with beautiful icons? Let’s take a look at the detailed tutorial below, I hope it can help everyone.
1. First select the appropriate editing area and drag it into the tree menu.

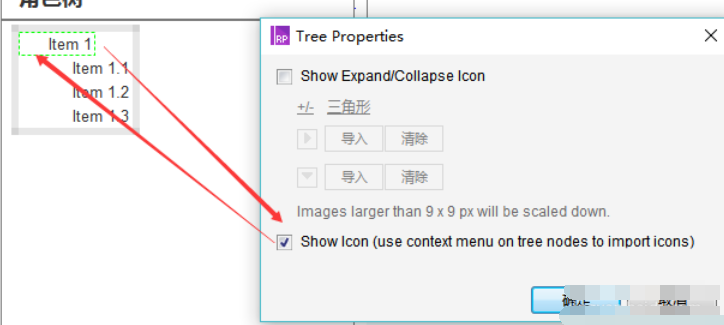
2. Right-click the menu, select the first one, edit the tree properties, and select the display icon form. There are two types. The first one can be set to expanded or unexpanded. The second one has only one style.
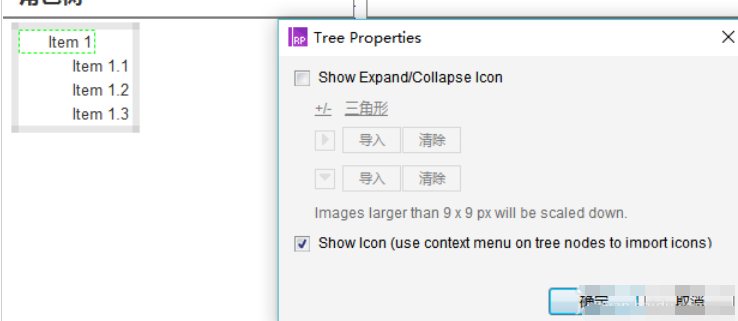
3. In the first form, put a check mark, import the picture or select +/-, the triangle can realize the icon style. The triangle is selected here, and so on. This form can also be used in the following.
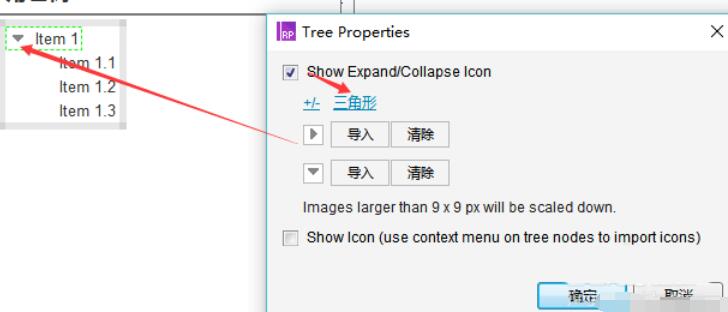
4. In the second form, check the second check box, uncheck the first check box, and click OK. There will be no icon at this time.
5. Right-click the menu, select the fourth, edit icon button, click Import, import the required image, select the application situation as needed, the same level node or the current node, etc., click OK, and the icon will appear.
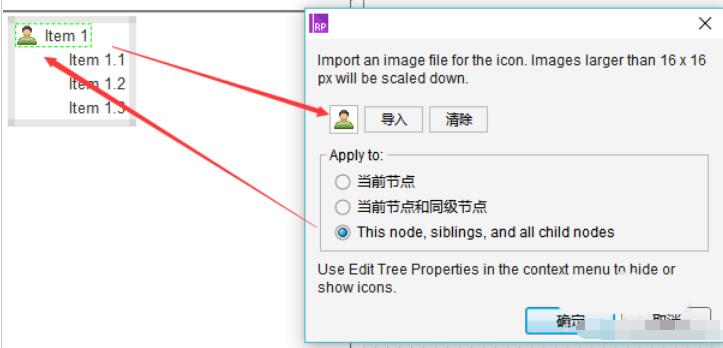
6. Just select the type according to your needs.
Friends who still don’t know the detailed steps of creating a tree menu with beautiful icons in Axure RP 8, don’t miss this article brought by the editor.
 How to set the windmill rotation in scratch-How to set the windmill rotation in scratch
 How to draw a spiral in scratch - How to draw a spiral in scratch
 How to create a ray background in scratch-How to create a ray background in scratch
 How to draw a timer in scratch - How to draw a timer in scratch
 How to import and export favorites in 115 browser? -115 Methods to import and export favorites in the browser
 WPS Office
 iQiyi
iQiyi
 Sohu video player
 Tencent Video
 Lightning simulator
 MuMu emulator
 Eggman Party
 WPS Office 2023
 Minecraft PCL2 Launcher
 What to do if there is no sound after reinstalling the computer system - Driver Wizard Tutorial
 How to switch accounts in WPS Office 2019-How to switch accounts in WPS Office 2019
 How to clear the cache of Google Chrome - How to clear the cache of Google Chrome
 How to practice typing with Kingsoft Typing Guide - How to practice typing with Kingsoft Typing Guide
 How to upgrade the bootcamp driver? How to upgrade the bootcamp driver