Adobe Photoshop CS6 is an iconic version launched in 2012 and is recognized as a classic in the field of digital image processing. With "performance revolution" as its core, this version is equipped with the Mercury Graphics engine for the first time, enabling real-time preview and extremely fast processing of operations such as liquefaction and deformation. Its dark work interface greatly improves visual comfort, while the breakthrough "content-aware" toolset (move, patch, fill) achieves pixel-level precise retouching through intelligent algorithms. Next, let Huajun editor explain to you how to use the red-eye tool in Photoshop CS6 and how to use the red-eye tool in Photoshop CS6!
first step
Start Photoshop CS6, click File → Open

Step 2
Use the Zoom Tool (Z) (shortcut Ctrl++) to zoom in on the red-eye area to ensure precise repair.
Or hold down the space bar and drag the image to quickly locate the red eye position.

Step 3
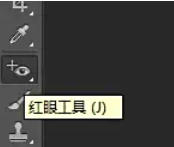
Find the Healing Brush tool group (the icon is "Band-Aid") in the left toolbar, and right-click on the tool group.
Select the Red Eye Tool in the pop-up menu (the icon is a small eye with a "+").
Tip: If the toolbar does not display the complete tool group, press and hold the tool icon to expand the hidden options.
Step 4
Adjust the following parameters in the top options bar (flexibly adjusted according to the severity of red-eye):
Pupil Size:
Control the repair range, 30%-50% is recommended (excessive value will cause the white area of the eyes to be repaired by mistake).
Darken Amount:
Control the depth of the pupil after repair, 50%-70% is recommended (if the value is too low, red eyes will remain, if the value is too high, it will turn black and unnatural).

Step 5
Move the mouse pointer to the red eye area and make sure the crosshair is aligned with the center of the pupil.
Left-click: Photoshop automatically recognizes red eyes and fixes them to natural pupil color.
Note: If the repair effect is not satisfactory, you can press Ctrl+Z to undo, readjust the parameters and click again.

Fix multiple eyes:
If there are two red eyes in the picture, repeat the above steps to fix the other eye.
Step 6
Zoom out (Ctrl+-) to observe the overall repair effect and make sure:
The pupil color is natural, with no color difference from the whites of the surrounding eyes.
No residual redness or dark spots from over-repairing.
Manual adjustment (optional):
If the automatic repair is not perfect, use the Brush Tool (B) to absorb the surrounding pupil color and manually apply the repair area.
Lower the brush opacity (30%-50%) to make the transition more natural.

Step 7
Click File → Save As (shortcut Ctrl+Shift+S).

In the pop-up dialog box:
Choose the format: JPEG (suitable for sharing on the web) or PSD (retains layers for later modification).
Adjust the quality: If you select JPEG, slide the quality slider to 8-10 (to avoid loss of image quality caused by compression).
Enter the file name and click Save.
The above is the editor of Huajun who has compiled for you how to use the red-eye tool in Photoshop CS6 and how to use the red-eye tool in Photoshop CS6. I hope it can help you!