How to create a region in CAD2018-How to create a region in CAD2018
Time: 2022-04-20Source: Huajun Software TutorialAuthor: Ai Xiaomo
Many people don’t know how to create a region in CAD2018? The article brought to you today is about how to create a region in CAD2018. If you still don’t know, let’s learn it with the editor.
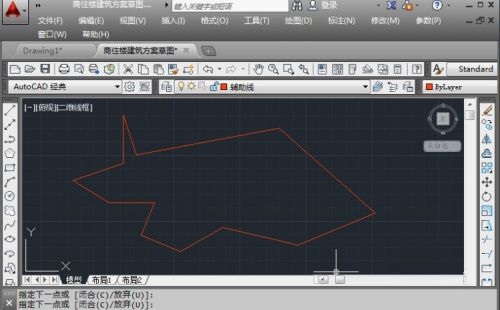
Step 1: Open CAD2018 and find the graphics where you need to create the area (as shown in the picture).
Step 2: Click the "Region" icon on the left side of the drawing interface, or click "Drawing" - "Region" in the menu bar (as shown in the figure).
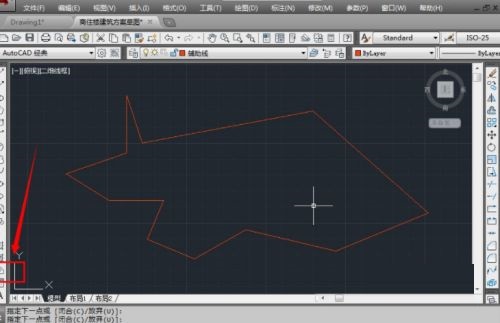
Step 3: Select the object and drag the mouse to select the object. You can use the mouse to click on the lines to select one by one, or you can use the window intersection to select (if the graphic selection is convenient). After selecting, click the "Enter key" to confirm (as shown in the picture).

The above is the entire content of how to create an area in CAD2018 brought to you by the editor. I hope it can help you.
Popular recommendations
-
autocad2010
Version: v2010Size: 28.18 MB
AutoCAD2010 is a landmark 2D drawing and 3D design software launched by Autodesk. It introduces powerful parametric drawing functions, extremely...
-
LeoCAD virtual LEGO model creation tool
Version: 18.01Size: 37.85MB
LeoCAD virtual LEGO model creation tool is an open source computer-aided design (CAD) software designed for creating virtual LEGO models. It uses GNU universal...
-
Haochen CAD picture viewing king
Version: 9.6.0Size: 4.25MB
Haochen CAD Viewer King is an Internet CAD view software produced by Suzhou Haochen Software Co., Ltd. This company has been in business since 1992...
-
Haochen CAD picture viewing king
Version: 9.6.0Size: 4.25MB
Haochen CAD Viewer is a CAD tool under Haochen Software that integrates quick drawing viewing and advanced DWG drawing. It focuses on cross-terminal (mobile phone/computer/network...
-
Haochen CAD
Version: 26.0.0.0Size: 509MB
Haochen CAD2026 is a 2DCAD platform software with independent core technology, internationally leading, and a perfect replacement for AutoCAD. Depth...