Hot search terms: 360 Security Guard Office365 360 browser WPS Office iQiyi Huawei Cloud Market Tencent Cloud Store
Hot search terms: 360 Security Guard Office365 360 browser WPS Office iQiyi Huawei Cloud Market Tencent Cloud Store

hardware tools Storage size: 0.14MB Time: 2021-03-25
Software introduction: Nantian pr2e driver supports xp and win7 systems. Many friends found that Nantian pr2e will malfunction during use. In fact, when pr2 leaves the factory...
How to install the driver for Nantian PR2E printer in Win7 system? Some netizens must not know much about it. For this reason, this article brought by the editor today will share with you how to install the driver for Nantian PR2E printer under Win7 system. Let’s take a look.
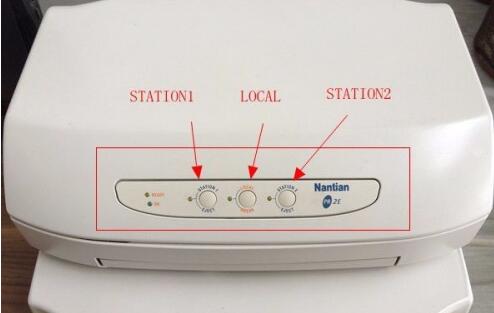
There are three buttons on the front of the printer: STATION1, LOCAL, and STATION2. Before turning on the machine, press and hold the STATION1 and STATION2 buttons at the same time, press the power button, and release after the machine self-test is completed.
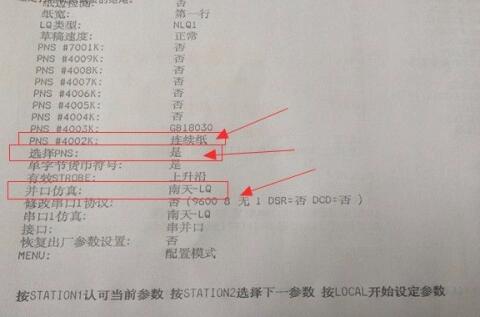
Put in A4 paper, the system will automatically print out. Press STATION1 to approve the current parameters, press STATION2 to select the next parameter, and press LOCAL to start setting parameters. Then enter configuration mode and set:
Interface - serial and parallel port; serial port 1 simulation - Nantian LQ; parallel port simulation - Nantian LQ
Select PNG - Yes; PNG#4002K - Continuous paper feed.
Other options can be left as default. After the final setting, press LOCAL and then STATION1 to save the parameters. You will hear a prompt sound and shut down and restart.
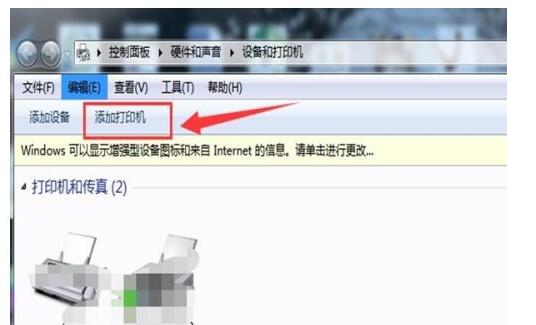
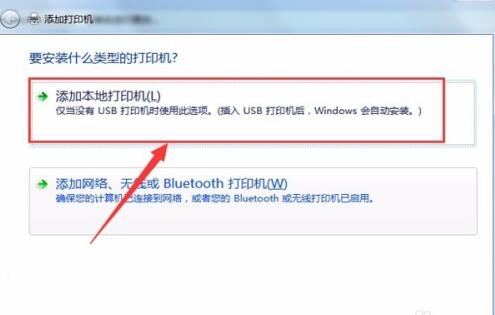
Click Computer, Start - Devices and Printers - Add Printer. (Before this, you need to connect the printer to the computer. It usually has a USB interface. Make sure the USB interface of the computer is easy to use and there is no problem with the USB cable.)
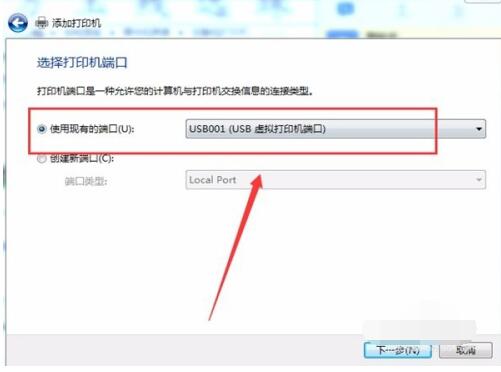
Select Add a local printer, select Use an existing port for the port, and select the USB port. (If there are multiple USB ports, you can choose any one. But make sure that the USB port you choose is not occupied by other external devices such as printers)
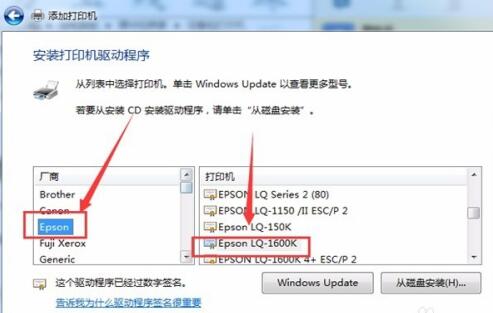
At this time, various manufacturers and printer models will appear for selection. Because there is no model we can use here, click Windows Update. Then have a cup of tea and wait slowly (this is slower, don’t worry, and try not to use other programs on the computer. If it fails, click Windows Update again to view more models.)

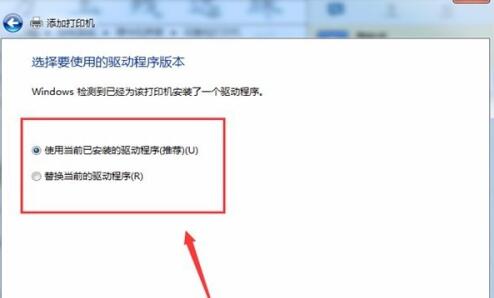
At this time we choose the manufacturer Epson and the printer Epson LQ-1600k (be sure to see it clearly, otherwise it will not succeed.) Next, choose to use the currently installed program.
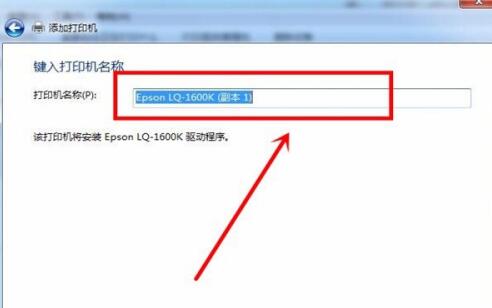
In the next step, the printer name can be changed to something you can easily identify (if there are multiple printers installed on the computer), or you can just use the default name. There’s nothing to say about this, it all depends on personal habits.
Click Next and you will be prompted whether to set it as the default printer. You can choose according to your own wishes. Below is a print test page. Let's click and put the paper into the printer. If the printer works, you will see a "Congratulations" on the printed paper. Just click Finish at the end.

The above is all the content brought to you by the editor. Have you all learned it?

 How does coreldraw generate barcodes - How does coreldraw generate barcodes
How to correct pictures with coreldraw - How to correct pictures with coreldraw
 How to split cells in coreldraw - How to split cells in coreldraw
 How to center the page in coreldraw - How to center the page in coreldraw
 How to customize symbols in coreldraw - How to customize symbols in coreldraw
 Sohu video player
 WPS Office
 Tencent Video
 Lightning simulator
 MuMu emulator
 iQiyi
iQiyi
 Eggman Party
 WPS Office 2023
 Minecraft PCL2 Launcher
 What to do if there is no sound after reinstalling the computer system - Driver Wizard Tutorial
 How to switch accounts in WPS Office 2019-How to switch accounts in WPS Office 2019
 How to clear the cache of Google Chrome - How to clear the cache of Google Chrome
 How to upgrade the bootcamp driver? How to upgrade the bootcamp driver