Using Word to automatically generate a table of contents based on the chapters of the article is not only fast, but also very convenient when reading and searching the content. Just hold down Ctrl and click on a chapter in the table of contents to jump directly to that page. More importantly, it is convenient for future modifications, because the finished article will inevitably be modified many times to add or delete content. If you label the table of contents manually, it will be a headache to change all subsequent page numbers if the content in the middle is changed. The table of contents should be automatically generated. You can modify the article content at will. Finally, updating the table of contents will re-map the table of contents to the corresponding page numbers.
Steps: (The following content is operated in Word2003. Other versions of Word are slightly different, but they are similar.)

①Select [Style and Format] in [Format]

② A "Style Format" column appears on the right, which mainly uses Title 1, Title 2, and Title 3. Apply Title 1, Title 2, and Title 3 to the titles of each chapter in the text. For example: We need to use Title 1 to define "Chapter 1 Introduction to Refrigeration" in the text. "1.1 Development History of Refrigeration Technology" is defined by Title 2. If there is 1.1.1×××, then use Title 3 to define it.

③ Of course, the attributes of Title 1, Title 2, and Title 3 (such as font size, centering, bold, etc.) can be modified by yourself. Modification method: Right-click "Title 1" and select "Modify". The modification menu will pop up. You can modify it according to your own requirements.
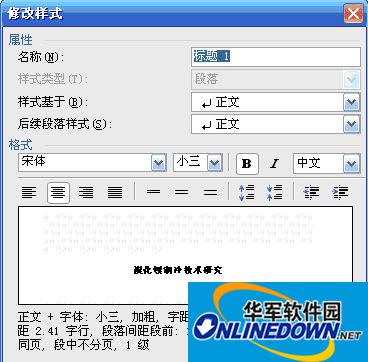

④Use headings 1, 2, and 3 to define each chapter in the text. It is very convenient to define. Just point the cursor on "Chapter 1: Introduction to Refrigeration", and then click the left mouse button on Title 1 on the right, and it is defined; in the same way, use Titles 2 and 3 to define 1.1; 1.1.1; and so on, Chapter 2 and Chapter 3 are also defined in this way until the end of the full text.
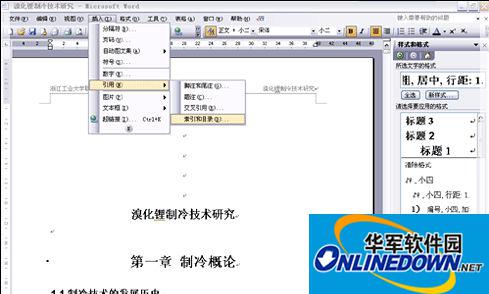
⑤When everything is defined, we can generate the directory. Move the cursor to the blank position at the beginning of the article where you want to insert the table of contents, and select [Insert]–[Quote]–[Index and Table of Contents]
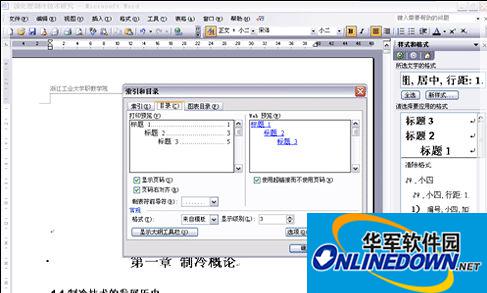
⑥Select the second tab [Directory], and then click OK on the lower right. That's OK.
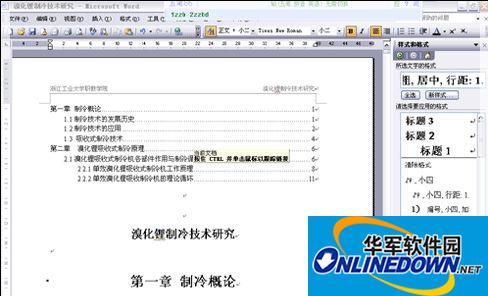
The picture above is the automatically generated directory
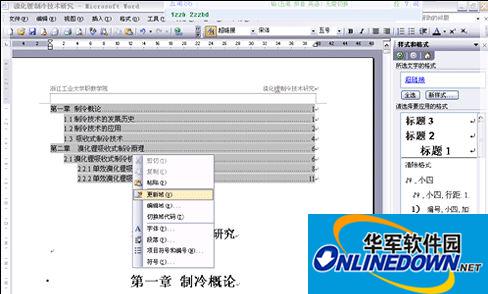
⑦After you re-modify the article content, you need to update the table of contents. The method is: right-click in the table of contents area and select [Update Domain]
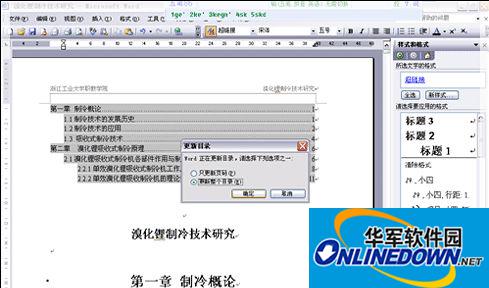
⑧After selecting [Update Domain], the check box in the picture above will appear. Select the second "Update Entire Directory" and click OK. That's OK.
