How to use PPT Beautification Master - Steps to remove disabled items with PPT Beautification Master
Time: 2021-09-06Source: Huajun Software TutorialAuthor: Qingchen
If you still don’t understand the operation of PPT Beautification Master to remove prohibited items, let’s take a look below about the steps of PPT Beautification Master to remove prohibited items. I hope it can help everyone.
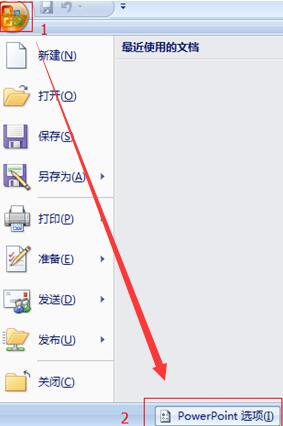
1. Open the PPT software, click the icon in the upper left corner, and click [PowerPoint Options] in the pop-up option sheet
2. In the opened [PowerPoint Options] window, click [Add-ins] on the left 》 Select [Disabled Items] in the “Management” option 》 Click [Go]. After clicking "Go", a window for disabled items will pop up. Select the item you want to re-enable in the list. Here, select PPT Beautifier (pptassist.dll) and click [Enable], so that PPT Beautifier can be re-added to PPT.

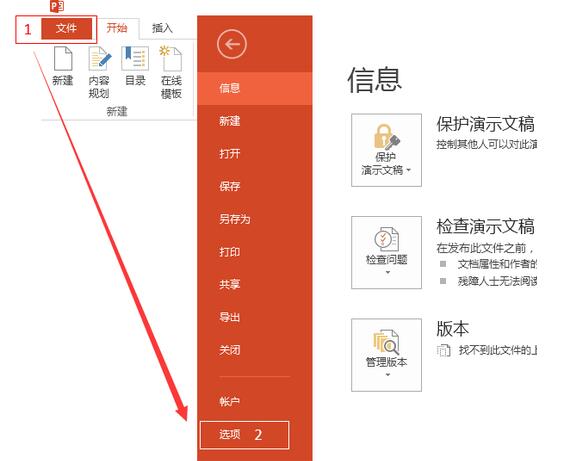
3. If Office 2010/2013 is installed on your computer, click the [File] option in the menu bar and click [Options] in the pop-up options. Other setting methods are the same as step 2.
Here are the steps for PPT Beautification Master to remove disabled items. Friends in need should hurry up and read this article.
Popular recommendations
-
Quick OCR text recognition
Version: 7.5.8.3Size: 2.51MB
Jisu OCR text recognition software is a domestic shared tool designed for Windows systems. It is designed to convert text in pictures, scanned documents, PDF and other files...
-
OCR text recognition software
Version: 4.0Size: 30.09MB
OCR text recognition software uses optical character recognition technology to convert text in unstructured documents such as pictures, scans, and PDFs into editable electronic text...
-
Hero Excel set wizard
Version: 1.006Size: 5MB
Hero Excel Template Wizard is a truly usable template printing software that can fill templates with Excel data and perform batch printing. Can be customized...
-
Extreme Office Government Edition
Version: v3.0.0.2Size: 159.69 MB
The official version of Speed Office Government Edition is an office software tailor-made by Haiteng Company for government services. The latest version of Speed Office Government Edition can be more...
-
Government WeChat
Version: 3.1.300.209Size: 498.52MB
The latest version of Government WeChat is a very professional mobile office software. The official version of Government WeChat has powerful and practical functions and can support internal mobile office and instant communication...