UltraISO floppy disk passIt is a powerful, convenient and practical floppy disk file creation/editing/conversion tool. It can directly edit floppy disk files and extract files from floppy disks. It can also create floppy disks directly from CD-ROM or create ISO files from files on the hard disk. At the same time, you can also process the boot information of the ISO file to create a bootable disc. Using UltraISO, you can create/edit floppy disk files as you like, and use the disc burning software to burn the discs you need. UltraISO PE2025 free download.
-
Free versionView
-
v9.7.1 Chinese versionView
-
9.7.6.3829View
-
9.6.2 Green versionView
-
v9.7.1.3519View

UltraISO function introduction
1. Create a CD image file from CD-ROM
Through the UltraISO Chinese version, users can directly write hard disk images, which provides great convenience for making CDs;
2. Make hard disk, optical disk, and network disk files into various image files
Through UltraISO, users can directly extract files and directories from disc images to create various image files;
3. Extract files or folders from ISO files
Users can directly edit ISO files on UltraISO and perform any operations such as adding, deleting, creating new directories, and renaming ISO files;
4. Edit various image files
UltraISO supports almost all known disc image file formats. Users can edit various image files through UltraISO (such as disc image files produced by Nero Burning ROM, Easy CD Creator, and Clone CD);
5. Create a bootable ISO file
UltraISO can be used to process CD boot information. Users can directly add/delete/obtain boot information in the ISO file;
6. Create and edit music CD files
Using UltraISO, users can create/edit disc image files as they wish, and use the disc burning software to burn the discs they need.
How to use UltraISO
How to burn system disk
use a simple method to burn an image disc using UltraISO!
Using UltraISO to burn a disc image requires the following basic conditions:
1. Image file, an image file with the extension *.iso (or 27 common disc image formats such as BIN, NRG, CIF, IMG, BWI, DAA, DMG, HFS, etc.).
2. UltraISO burning software. The computer needs to install the burning software (UltraISO Soft Disk Pass) to achieve burning.
3. Blank disc. Burning ISO image requires a blank disc.
4. Burning optical drive. The computer needs to have a burning optical drive. The burning optical drive is the most basic and necessary condition for burning images!
After determining the basic conditions, enter the burning step:
The first step is to put the blank disc into the recorder.
The second step is to start the UltraISO burning software.
The third step is to enter the burning disc image interface. There are three methods (just choose any one):
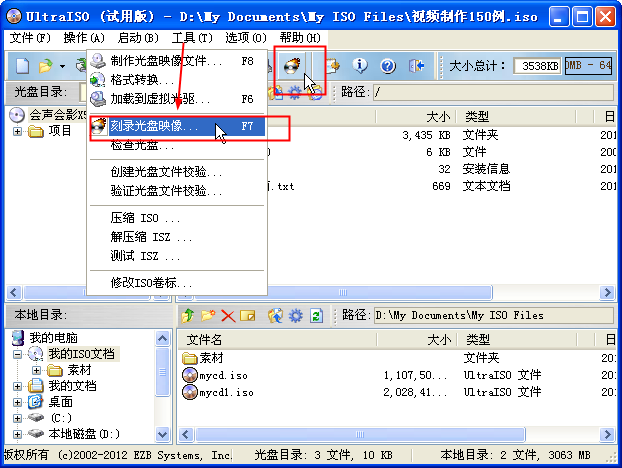
1. Press F7 directly on the keyboard.
2. Use the mouse to click the burn button on the UltraISO interface.
3. Select "Tools -> Burn Disc Image".
After entering the disc image burning interface, we will see the following interface

The fourth step is to set the relevant burning options.
1. Burner, generally there is only one burner. The default is used here and does not need to be changed. (If there are more than two recorders, you can select the recorder to be used through the drop-down menu button.)
2. Burning verification, click this option with the mouse to check whether your disc has been burned successfully after burning.
3. Writing speed, you can select the burning speed through the drop-down menu button: 24x or below is recommended for CD; 8x is best for DVD.
4. The writing method can be changed through the drop-down menu button, and the default is generally used.
5. Image file, select the image file, click the browse button to find the image file to be burned. After everything is set up, the interface is as follows:
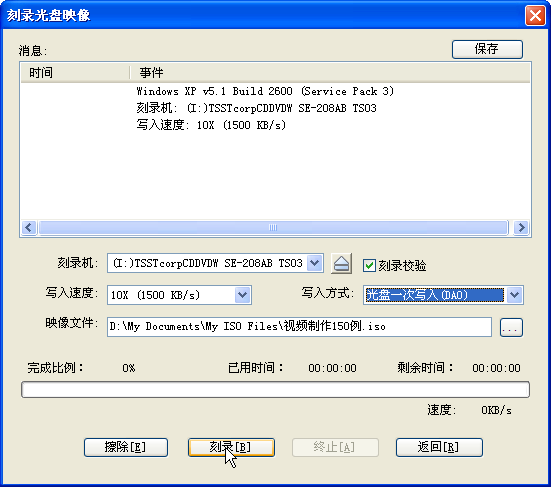
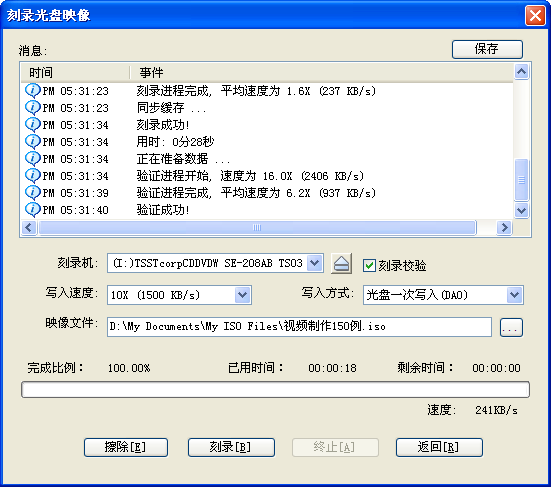
The fifth step is to burn. Click the "Burn" button to start burning the disc image. "Burn + Burn Verification" may take a few minutes to more than ten minutes. Please wait patiently for the burning to complete. After the burning is completed, the optical drive will automatically eject. Burning successful.
UltraISOFAQ
Question: How to use Ultraiso to create a PE/system disk U disk system?
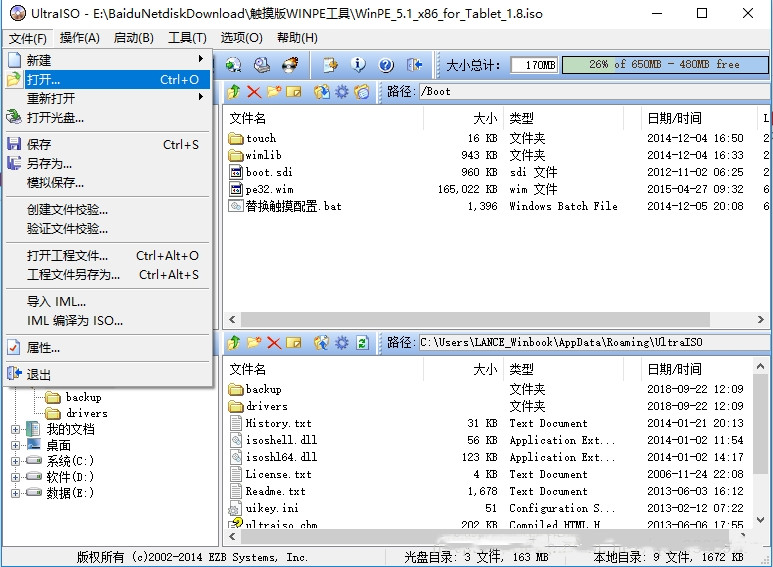
1. Open the Ultraiso software and open the PE disk/system disk image to be written. This step demonstrates writing a WINPE touch version boot disk image suitable for tablet x86 architecture.
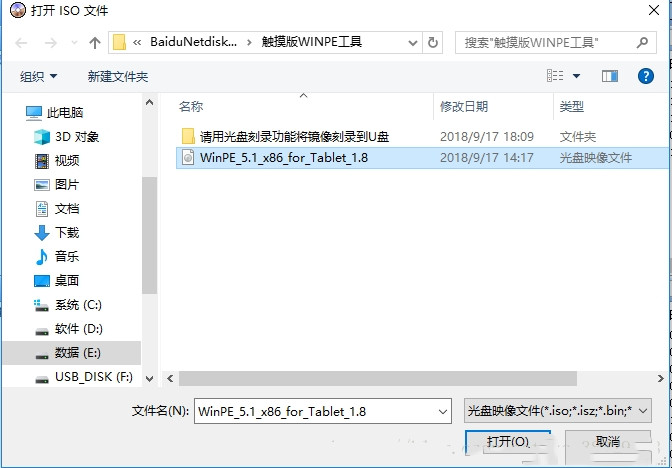
2. Write the image to the USB disk
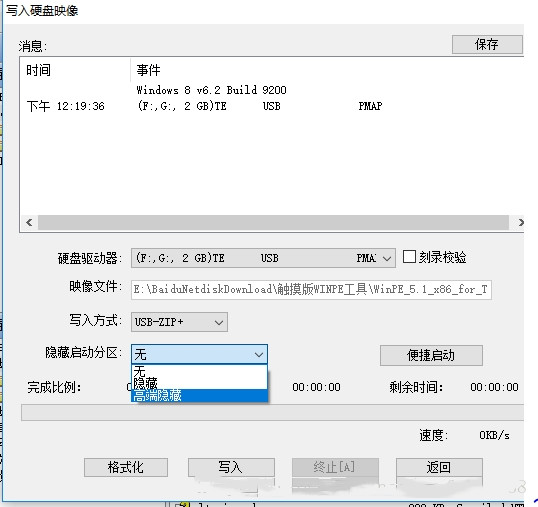
3.Select the write option. For the hard drive, select the U disk letter to be written, and the writing method can be any one of USB-HDD/USB-HDD+/USB-ZIP+/USB-HDD+V2/USB-ZIP+V2, except USB-ZIP.
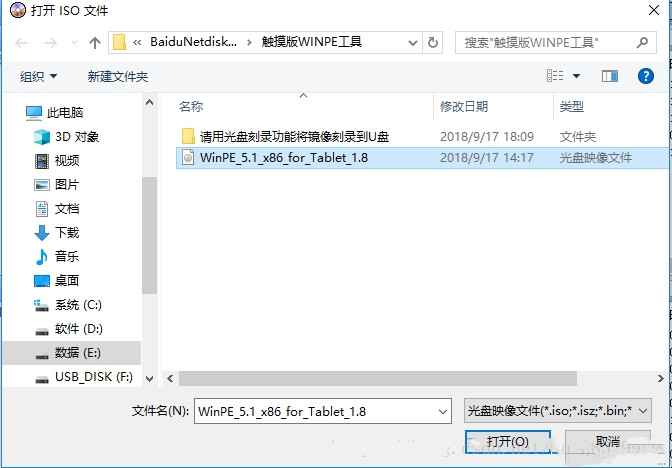
4. To hide the boot partition, choose high-end hiding. If the V2 type is selected as the writing method, you can also choose depth hiding. (Deep hiding may cause some models to be unable to recognize the PE disk. After deep hiding, the PE disk letter will not appear in my computer)
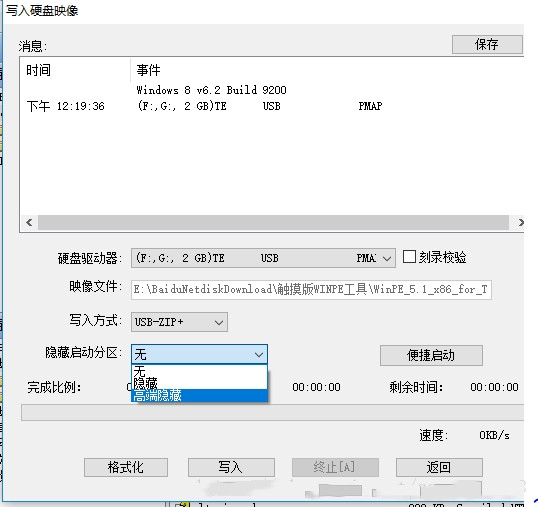
5. After writing the image, as shown below. (The picture below shows the high-end hidden mode)

At this time, we can select the F drive here, which is another U disk partition with a non-PE drive letter, and format it into a partition such as NTFS that can write files exceeding 4GB and other operations we need.
UltraISO update instructions
1. Can edit Windows 7/8 x64 ISO image files containing EFI boot records
2. You can create a Mac OS X Mountain Lion bootable USB drive directly from the dmg image
3. Added bootpart driver to support access to boot partition in Windows (PE) environment (deep hiding)
4. Support high-end hidden boot partition (bootmgr)
5. Support copying bootable USB disk (RAW mode)
6. Sector alignment when formatting the U disk as a FAT file volume
7. Able to detect and use DVBFab virtual optical drive
8. Fixed an error when processing Fedora 17 and CentOS 6.2 ISO image files
9. Fixed the error of splitting image files in VMWare Fusion(Mac) or Wine(Linux) environment
10. Some minor improvements and bug fixes
Huajun editor recommends:
The editor has also usedJinfeiyi DVD Burning Master,Beaver DVD burning software,nero9Other software with similar functions to this software are available and can be downloaded and used!










Useful
Useful
Useful