- Green versionView
- Green versionView
- Green versionView
- Green versionView
SQLiteStudio is a cross-platform SQLite database management tool developed using Tcl language.
Features of SQLiteStudio:
Full-featured sqlite2 and sqlite3 tools, view encoding supports utf8.
Support export data formats: csv, html, plain, sql, xml,
Multiple database files can be opened at the same time
Support viewing and editing binary fields
How to use SqliteStudio?
Use "sqlitestudio" to open (you can also use other sqlite visualization tools. I am used to using this tool. It is multi-language and compact and does not require installation)
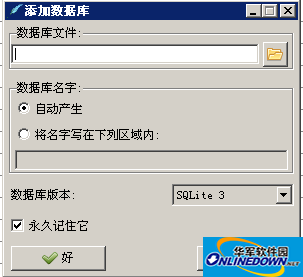
1. Open sqlitestudio "Database"-"Add Database"

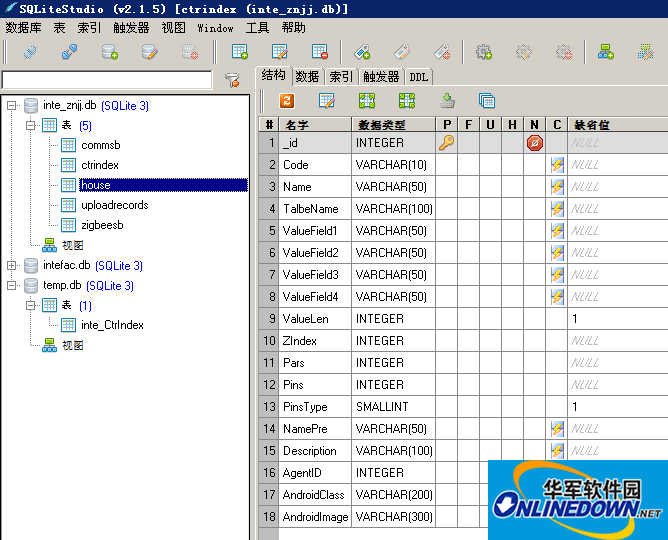
2. Select the exported database file and open it directly.

3. In sqlitestudio, you can create and modify tables and execute SQL statements, which can basically meet common needs.
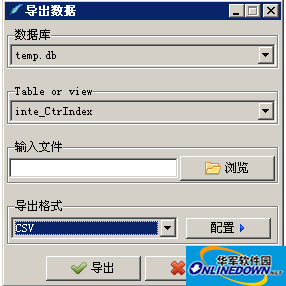
In sqlitestudio, export table data by right-clicking "Export Table". The default format is CSV file.

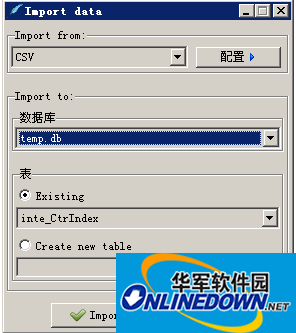
4. Import table data:
Right-click the table name and "import data to table"

SqliteStudio uses existing SQLite database in Android program
1. Prepare SQLite database file
Suppose you have created a sqlite database and we need to make some modifications to it.
(Translator’s note: The original article here recommends a SQLite database management software. I think you can follow your own preferences. There are many visual SQlite database management software under Windows, which can easily read and edit the database. For example, I use sqlitestudio
Open the database, add a new table "android_metadata", and insert a row of data. The specific SQL is as follows:
[sql] view plaincopyprint? View code slices on CODE derived to my code slices
CREATE TABLE "android_metadata" ("locale" TEXT DEFAULT 'en_US')
INSERT INTO "android_metadata" VALUES ('en_US')
(Translator's Note: The above two lines indicate the operations that need to be performed, which can be completed directly in sqlitesstudio)
Then you need to rename the primary id column of your data table to "_id", so that Adroid will know how to bind the id column, and you can easily edit the column in SQlite database management software.
After these two steps, your sqlite database file is ready.
(Translator's note: I retained the id column here, that is, I did not rename it, and the test proved that there is no problem)
2. Copy, open and access the database in your Android application
Now put the database file you prepared in the previous step under the "assets" folder, and then create a Database Helper class by inheriting the SQLiteOpenHelper class.
Your DataBaseHelper class could roughly look like this:
public class DataBaseHelper extends SQLiteOpenHelper{
//The Android's default system path of your application database.
private static String DB_PATH = "/data/data/YOUR_PACKAGE/databases/";
Private static String DB_NAME = "myDBName";
private SQLiteDatabase myDataBase;
private final Context myContext;
/**
* Constructor
* Takes and keeps a reference of the passed context in order to access the application assets and resources.
* @param context
*/
public DataBaseHelper(Context context) {
super(context, DB_NAME, null, 1);
This.myContext = context;
} }
/**
* Creates an empty database on the system and rewrites it with your own database.
* */
Public void createDataBase() throws IOException{
boolean dbExist = checkDataBase();
if(dbExist){
//do nothing - database already exists
}else{
//By calling this method and empty database will be created into the default system path
//of your application so we are gonna be able to overwrite that database with our database.
This.getReadableDatabase();
try {
copyDataBase();
} catch (IOException e) {
throw new Error("Error copying database");
} }
/**
* Check if the database already exists to avoid re-copying the file each time you open the application.
* @return true if it exists, false if it doesn't
*/
private boolean checkDataBase(){
SQLiteDatabase checkDB = null;
try{
String myPath = DB_PATH + DB_NAME;
checkDB = SQLiteDatabase.openDatabase(myPath, null, SQLiteDatabase.OPEN_READONLY);
}catch(SQLiteException e){
//database does't exist yet.
if(checkDB != null){
checkDB.close();
Return checkDB != null ? true : false;
} }
/**
* Copies your database from your local assets-folder to the just created empty database in the
* system folder, from where it can be accessed and handled.
* This is done by transferring bytestream.
* */
private void copyDataBase() throws IOException{
//Open your local db as the input stream
InputStream myInput = myContext.getAssets().open(DB_NAME);
// Path to the just created empty db
String outFileName = DB_PATH + DB_NAME;
//Open the empty db as the output stream
OutputStream myOutput = new FileOutputStream(outFileName);
//transfer bytes from the inputfile to the outputfile
byte[] buffer = new byte[1024];
int length;
while ((length = myInput.read(buffer))>0){
myOutput.write(buffer, 0, length);
//Close the streams
myOutput.flush();
myOutput.close();
myInput.close();
}
public void openDataBase() throws SQLException{
//Open the database
String myPath = DB_PATH + DB_NAME;
myDataBase = SQLiteDatabase.openDatabase(myPath, null, SQLiteDatabase.OPEN_READONLY);
}
@Override
public synchronized void close() {
if(myDataBase != null)
myDataBase.close();
super.close();
}
@Override
public void onCreate(SQLiteDatabase db) {
}
@Override
public void onUpgrade(SQLiteDatabase db, int oldVersion, int newVersion) {
}
// Add your public helper methods to access and get content from the database.
// You could return cursors by doing "return myDataBase.query(....)" so it'd be easy
// to you to create adapters for your views.
}
就这样。
现在你可以创建一个新的DataBaseHelper实例,然后调用createDataBase(),然后再调用openDataBase()方法,记住修改DB_PATH字符串中“YOUR_PACKAGE”为你真正的package名称(也就是说com.examplename.myapp)
以下是示范代码:
[java] view plaincopyprint?在CODE上查看代码片派生到我的代码片
...
DataBaseHelper myDbHelper = new DataBaseHelper();
myDbHelper = new DataBaseHelper(this);
try {
myDbHelper.createDataBase();
} catch (IOException ioe) {
throw new Error("Unable to create database");
}
try {
myDbHelper.openDataBase();
}catch(SQLException sqle){
throw sqle;
}
...


有用
有用
有用