Hot search terms: 360 Security Guard Office365 360 browser WPS Office iQiyi Huawei Cloud Market Tencent Cloud Store

Hot search terms: 360 Security Guard Office365 360 browser WPS Office iQiyi Huawei Cloud Market Tencent Cloud Store

System assistance Storage: 4.54GB Time: 2021-06-29
Software introduction: Windows 11 concept version is a brand new operating system launched by Microsoft. The latest version of windows11 system is simpler than win10,...
Many friends said that during the process of installing the Windows 11 system, they found that their computers could not install Windows 11. What should they do? The following editor will explain to you the solution to the problem of being unable to install Windows 11. I hope it can help you.
This error occurs when you run the PC Health Checkup application to check whether your computer supports Windows 11 or when you try to install Windows 11 from a bootable flash drive or using the installation files from the installed ISO.
For Windows 11 to be compatible with your computer, it must support UEFI and Secure Boot, and TPM 2.0 (Trusted Platform Module) must be enabled.
Because Windows 11 requires a UEFI Secure Boot-compatible system, if you installed Windows 10 through legacy boot mode, the installer will not detect the required features.
This will trigger the Windows 11 cannot be installed on this PC error because the system requirements are not met. Even if your computer supports Secure Boot and TPM 2.0, you may still need to enable them to resolve the error manually.
If you are using legacy boot mode, you will need to set the boot mode to UEFI in the BIOS settings to enable the Secure Boot feature (and possibly turn on TPM 2.0).
1. Enable Secure Boot in Windows 10
Taking Dell Bios as an example, follow the steps below to enable Secure Boot compatibility in Windows 10.
1) Then shut down your computer.
2) Restart the system and start pressing the F2 shortcut key to enter the BIOS setup. Different laptops may use other function keys such as F12, F10, F8, or the Esc key to enter the BIOS.
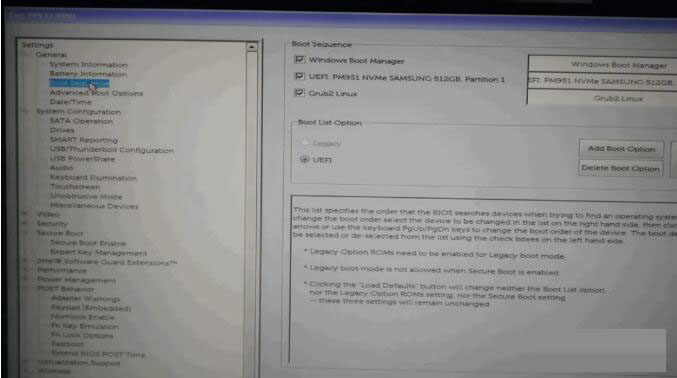
3) In the BIOS, use the arrow keys or mouse to open the General - Boot Sequence tab. Check if the boot mode is set to legacy. To change the boot mode, select UEFI. (Use the arrow keys to select or the mouse to select).

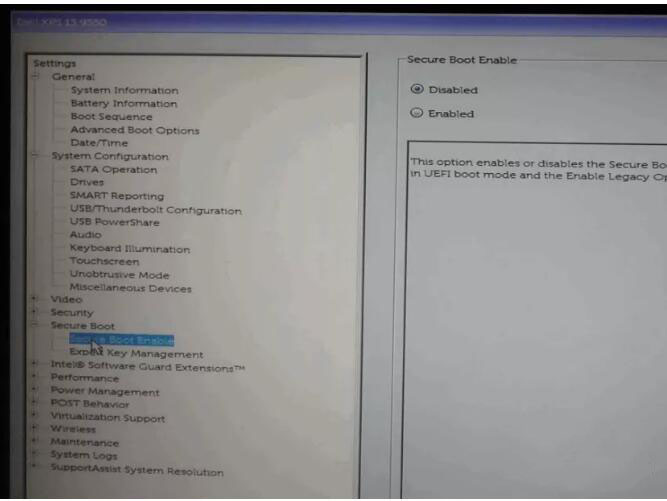
4) Next, open the Secure Boot tab and enable Secure Boot on your computer (select Enabled).

After enabling Secure Boot and UEFI, make sure that TPM 2.0 is also enabled for your computer. So, do not close the BIOS setup menu.
2. Enable TPM 2.0
TPM 2.0 functionality is also accessible from BIOS settings.
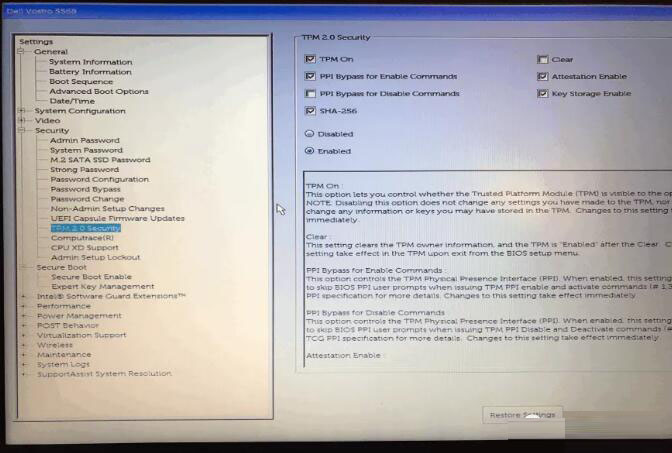
1) In the BIOS, open the Security (Security - Security 2.0) tab and check whether TPM On is checked. After selecting, click Apply to save changes and exit.

With the above method, you have successfully enabled Secure Boot compatibility and TPM 2.0 on Windows 10. Restart your computer, run PC Health Checkup, or install Windows 11 to see if the error is resolved.
If you change the boot mode of an existing Windows 10 installation from Legacy to UEFI, you may encounter a boot device not found error.
You can easily boot into an existing Windows 10 installation by changing the boot mode from UEFI to Legacy again in the BIOS settings.
Note:
Different brands of Bios have different interfaces. Please adjust according to the actual situation when setting up. If the computer motherboard is too old and does not support UEFI or secure boot, it will not be able to use the Windows 11 system.
The above is the solution to the problem of being unable to install Windows 11 explained by the editor. Friends in need should hurry up and learn it!
 How does coreldraw generate barcodes - How does coreldraw generate barcodes
 How to correct pictures with coreldraw - How to correct pictures with coreldraw
 How to split cells in coreldraw - How to split cells in coreldraw
 How to center the page in coreldraw - How to center the page in coreldraw
 How to customize symbols in coreldraw - How to customize symbols in coreldraw
 Sohu video player
 WPS Office
 Tencent Video
 Lightning simulator
 MuMu emulator
 iQiyi
iQiyi
 Eggman Party
 WPS Office 2023
 Minecraft PCL2 Launcher
 What to do if there is no sound after reinstalling the computer system - Driver Wizard Tutorial
 How to switch accounts in WPS Office 2019-How to switch accounts in WPS Office 2019
 How to clear the cache of Google Chrome - How to clear the cache of Google Chrome
 How to practice typing with Kingsoft Typing Guide - How to practice typing with Kingsoft Typing Guide
 How to upgrade the bootcamp driver? How to upgrade the bootcamp driver