
-
Realtek HD audio manager (Realtek HD audio)
- Size: 103.91M
- Language: Simplified Chinese
- Category: media management
- System: WinAll


Realtek High Definition Audio ManagerIt is officially launched by Realtek for its own sound card.Audio managementTools. Realtek High Definition AudioManagerIt is very convenient to manage. Users can modify ordinary music into symphony, rock music and other effects with simple mouse clicks, which is simply good news for music lovers. Huajun Software Park provides you with free download of Realtek HD audio manager, come and experience it!
 online use")
Realtek High Definition Audio Manager FAQ
How to set up realtek high definition audio managerAudioand headphones
1. Open the Control Panel: Find the "Control Panel" option in the start menu in the lower left corner of the computer, and then click to enter.
2. Find Realtek High Definition Audio Manager: In the control panel, find and click "Realtek High Definition Audio Manager". Please note that the names may vary depending on the sound card driver, but they are usually easy to find.
3. Set up the speakers:
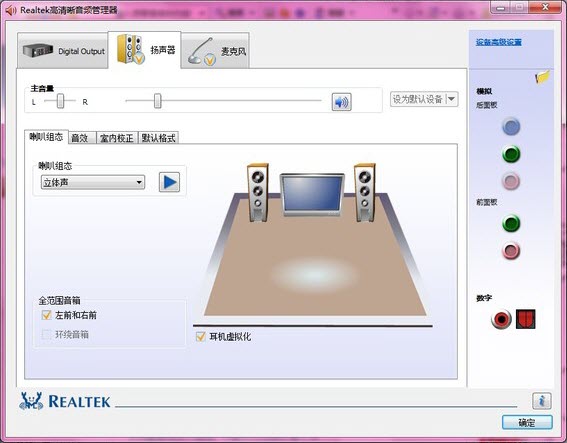
Speaker configuration settings: In the Realtek High Definition Audio Manager, set the main volume to Balanced, and adjust the volume as needed. Set to stereo and check front left and front right.
Sound effect settings: The sound effects part mainly sets the environment and equalizer. Typically, Ambient can be set to Room and EQ to None. Other settings such as vocal cancellation and karaoke can be adjusted according to personal needs.
Indoor correction settings: This section usually uses the default settings.
4. Set up the headset:
Unmute settings: In the advanced settings page of Realtek High Definition Audio Manager, uncheck the option "Mute rear output devices when front headphone devices are plugged in".
Disable socket detection: Click the "wrench" icon in the lower right corner, enter the panel settings, and check "Disable socket detection".
Jack settings: Click the "Jack Settings" button (wrench icon) in the lower right corner, click "AC97 Front Panel" in the pop-up panel, then reload the audio device, and click OK when completed.
")
realtek high definition audiomanagementThe device keeps popping up
Put a check mark in front of "Disable front panel jack detection" as shown in the picture, click OK, and the front panel jack will not be detected. In addition, some audio managers have an additional option "When a device is plugged in, turn on the automatic pop-up dialog box." If you encounter this option, you also need to remove the previous check mark and click OK, and the audio manager window will no longer pop up.
 software download")
realtek high definition soundFrequencyManager not found
Method 1:
Use the search in the lower left corner of the computer to enter "Control Panel" and click to open the control panel, then find "Hardware and Sound" in the Control Panel, and then find "realtek High Definition Audio Manager" under the Hardware and Sound interface.
Method 2:Use the shortcut key WIN+R to open the run, then enter msconfig during the run and press Enter to confirm; select the startup option in the system configuration program that opens and then check "realtek High Definition Audio Manager" to confirm the restart; after the restart is completed, you can find the realtek High Definition Audio Manager program in the taskbar.
How to adjust Realtek HD Audio Manager
Open the Audio Manager: Right-click the speaker icon in the taskbar and select "Realtek HD Audio Manager".
Adjust settings: In the audio manager interface, you can adjust various audio settings, such as output device, volume, microphone, etc.
Jack Settings: In the Connections tab, the functionality of individual jacks can be manually configured.
Realtek High Definition Audio Manager Interface
The interface of Realtek HD Audio Manager usually includes multiple tabs, such as "Playback", "Recording", "Volume", "Advanced Device Settings", etc., where users can configure the audio device in detail.
Realtek High Definition Audio Manager does not respond when clicked
If nothing happens when you click Realtek HD Audio Manager, you can try the following steps:
Check whether the audio device is connected properly.
Update or reinstall the audio driver.
Check for viruses and eliminate malware interference.
How to adjust jack settings in Realtek High Definition Audio Manager
Open Realtek HD Audio Manager.
Click the "Settings" icon in the upper right corner.
In the advanced settings, uncheck "Mute rear output devices when front headphone devices are plugged in."
Click the "wrench" icon in the lower right corner, enter the panel settings, check "Disable socket detection", and then confirm.
Realtek HD Audio Manager back panel default settings
Realtek HD Audio Manager's rear panel default settings typically automatically recognize the function of each jack based on the sound card's configuration. If you need to adjust manually, you can find the Connections tab in the Audio Manager and configure the purpose of each jack as needed.
How to set up speakers and headphones in Realtek High Definition Audio Manager
In Realtek HD Audio Manager, select the Playback tab.
In the device list, select the speaker or headphone device you want to use.
Right-click the device and select "Set as Default Device".
Adjust volume and other audio settings for optimal sound.
How to set up Realtek High Definition Audio Manager
Open Realtek HD Audio Manager.
In the Playback or Recording tab, select the device you want to configure.
Right-click the device and select "Properties" for detailed settings.
In "Device Advanced Settings", you can adjust the audio format and other advanced parameters.
How to set up Realtek High Definition Audio Manager better
Sound quality optimization: In the audio manager, enable high-fidelity sound quality mode and adjust equalizer settings to suit different music styles.
Device configuration: Correctly configure jack functions and output devices according to the actual audio equipment used.
Driver Updates: Regularly update audio drivers to ensure compatibility and sound performance.
How to open Realtek High Definition Audio Manager
Via the taskbar: Right-click the speaker icon in the taskbar and select "Realtek HD Audio Manager".
Via Control Panel: Go to "Control Panel", find "Realtek HD Audio Manager" and open it.
Realtek HD Audio Manager Default Settings
Realtek HD Audio Manager's default settings are usually optimized based on the characteristics of the sound card and the requirements of the operating system. If you need to restore default settings, you can find the "Restore default settings" option in the audio manager, or reset the audio format and other parameters in the device properties.
Realtek High Definition Audio Manager Software Features
Support Windows 7
realtekhigh definitionThe audio manager supports Windows 7, which solves the problem that the front panel of Windows 7 cannot output;
Easy to operate
Realtek High Definition Audio Manager is a high-level audio manager, but the design of the operation interface is very simple and intuitive. Isn’t this contrast great?
Mellow sound quality
Compared with the built-in SRS Audio Sanbox audio manager, the sound of realtek high-definition audio manager is obviously much richer;
Realtek High Definition Audio Manager Installation Steps
1. Download the Realtek High Definition Audio Manager software package from Huajun Software Park, unzip the compressed package directly, and double-click with the left mouse button to open the installation file.
Note: Decompressing the compressed package requires the use of a compression and decompression tool, which is recommended.WinRAR, the technology is mature and reliable. WinRAR download address:http://softwaredownload4.com/soft/5.htm
")

2. First wait for the installation file to be loaded. This process takes about 2 minutes.
 official download")
3. After entering the installation program, click the "Next" button below to start the installation. Realtek High Definition Audio Manager will be installed in the C drive by default.
 latest version download")
4. The installation process of Realtek High Definition Audio Manager takes about 3 minutes, please wait patiently.
 official website version download")
5. After the installation is completed, you will be asked whether to restart the computer to completely complete the installation. If it cannot be restarted temporarily, click to select the "No, restart the computer later" option, and click "Finish" below.
 latest version installation")
Realtek High Definition Audio Manager Usage Tips
1. Open the installed Realtek High Definition Audio Manager, and you can directly click the button as shown in the picture to start and stop the equalizer.
 download and installation")
2. You can then select the sound effects through the drop-down menu in the selection box above.

3. Switch to the "Mixer" tab, and you can adjust the channel, pitch and other values by clicking and dragging with the left mouse button.
 download official version")
4. In the "Audio I/O" tab. First select the sound output device, and then the device connector setting window will pop up. If there is no sound after plugging the device into the computer, you can view it from here.
 online use web version")
 PC version")
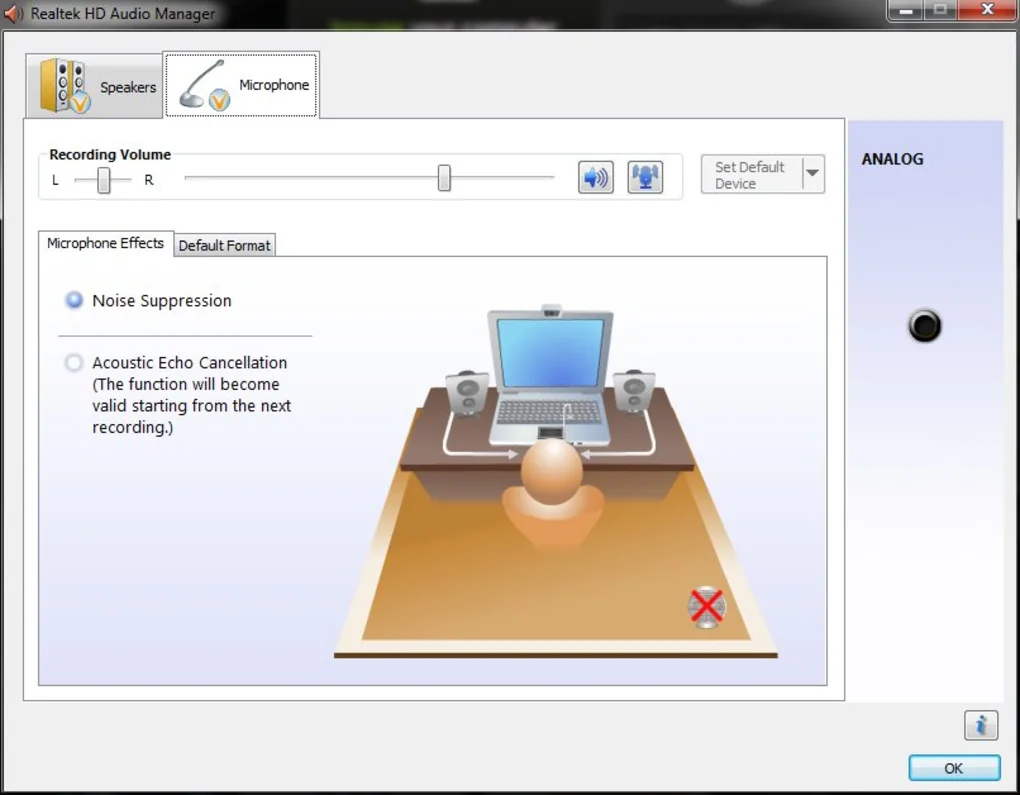
5. Afterwards, with the microphone plugged in, switch to the "Microphone" tab, and you can modify the effects of noise and echo by clicking to select and cancel options.
 PC version")
6. The final "3D audio demonstration" will display the sound waves in the form of a 3D model, allowing you to see the sound effect more intuitively.
 PC version download")
Realtek High Definition Audio Manager update log
1: Brand new interface, refreshing, simple and efficient
2: Performance is getting better and better
Huajun editor recommends:
Realtek HD audio manager (Realtek HD audio) has become very stable and powerful after official official updates and iterations, meeting all your needs. The editor has also prepared a magic show live broadcast companion, a CD to MP3 format converter, and a silencer magician for you.
Version: v2.82 official version | Update time: 2025-11-17
Similar recommendations


Latest updates


Realtek HD Audio Review
-
1st floor Huajun netizen 2022-03-05 20:48:06Realtek HD audio manager is very useful, thank you! !
-
2nd floor Huajun netizen 2022-03-25 21:24:43Realtek HD audio manager (Realtek HD audio) software is very easy to use, downloads quickly and is very convenient!
-
3rd floor Huajun netizen 2022-02-20 09:27:53Realtek HD audio manager (Realtek HD audio) overall feels good, I am quite satisfied, the installation and operation are very smooth! It went very smoothly following the installation step-by-step instructions!
Recommended products
-

tap lightly
-

VideoStudio Pro X8
-

VideoStudio X7 (Corel VideoStudio)
-

Simplified musical notation software
-

Corel VideoStudio Pro X8
-
Realtek HD audio manager (Realtek HD audio)
-
Realtek HD audio manager (Realtek HD audio)
-
Realtek HD audio manager (Realtek HD audio)
-
Realtek HD audio manager (Realtek HD audio)
-
Realtek HD audio manager (Realtek HD audio)
- Diablo game tool collection
- Group purchasing software collection area
- p2p seed search artifact download-P2P seed search artifact special topic
- adobe software encyclopedia - adobe full range of software downloads - adobe software downloads
- Safe Internet Encyclopedia
- Browser PC version download-browser download collection
- Diablo 3 game collection
- Anxin Quote Software
- Which Key Wizard software is better? Key Wizard software collection