Some novice friends must not understand the related operations of Partition Assistant for quick disk partitioning, and below the editor has shared the content of Partition Assistant’s operations for fast disk partitioning. I hope friends in need can come and learn together.
Open the Partition Assistant Professional Edition and perform the following operations
1. Select the disk

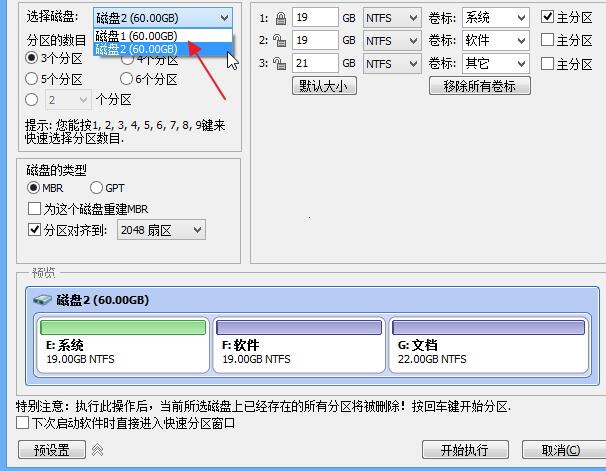
You can select the disk you want to quickly partition at the location pointed by the arrow in the picture above. It is recommended to create a partition assistant bootable disk first, and then boot from the bootable disk to quickly partition the system disk.
At the same time, please note that if the disk already has partitions, all partitions on the disk will be deleted after performing a quick partition operation.
2. Number of partitions
Under “Select Disk”, please select the number of partitions you want.
How to operate:
You can press 1,2,3,4,5,6,7,8,9 keys to quickly select the number of partitions. It can also be operated by mouse click. After selection, the right half of the dialog box immediately displays the corresponding number of partition lists.
3. Type of disk
Select the MBR disk type or GPT disk type in this panel, and decide whether to check "Rebuild MBR for this disk" and select which sector to align the partition to.
MBR disk: MBR disk supports up to 2TB. If it is a disk larger than 2TB, choosing MBR format will cause a waste of disk capacity. It is recommended to choose GPT format.
GPT disk: If the disk is larger than 2TB or the system needs to be installed on the disk and booted in UEFI mode, it is recommended to choose the GPT format.
Rebuild MBR for this disk: If an MBR-based boot manager exists on the disk and you still need to preserve it, leave this option unchecked.
Partition alignment: Generally, solid state drives (SSD) can be aligned to 4K, which is 8 sectors. This item has little impact on mechanical hard drives and can be left unchecked.
4. Partition parameters
"Partition Parameters" displays the basic parameters of each partition, including partition type, size, volume label, whether it is a primary partition, etc.
Resize partition
The software will automatically set a default value for each partition size based on the hard disk size. You can also enter your own numerical values to set the size of each partition. After clicking "Default Size", it will automatically return to the default size. /li>
Adjust the partition file system
There are NTFS and FAT32 file systems to choose from. FAT32 does not support partitions larger than 2TB, nor does it support storing single files larger than 4GB, but FAT32 has better compatibility. NTFS is more stable and secure, supports partitions larger than 2TB and supports storage of single files larger than 4GB. Generally, it is recommended that users choose the NTFS file system.
Adjust the label
The software sets a default volume label for each partition. Users can choose or change it themselves. They can also click the "Remove All Volume Labels" button to remove the labels of all partitions and then set their own volume labels.
Determines whether the volume is a primary partition
If you decide that the volume is the primary partition, check "Primary Partition"; otherwise, leave it unchecked. If you create 4 partitions on an MBR disk, you can set all 4 partitions as primary partitions. If you create more than 4 partitions, you can set up to 3 partitions as primary partitions. If you select a GPT disk, this item cannot be selected because there is no concept of a primary logical partition on a GPT disk, and all partitions created are "primary" partitions by default.
After the setting is completed, you can visually view the partitioning status of the disk after quick partition in the preview window below. Click the "Start Execution" button to achieve one-click quick partitioning. If a partition already exists on the disk, a confirmation dialog box will pop up (if there is no partition on the disk, this dialog box will not pop up), as shown in the figure:

Click Yes to continue, click No to cancel.
5. Preset
For users who often need to partition their hard drives, you can check the “Go directly to the quick partition window when you start the software next time” option above the presets, so that you can directly enter the quick partition window every time you start the software. At the same time, click the Default Value button to preset the number and size of hard disk partitions. This provides convenience for partitioning multiple hard drives of the same type. Installation workers who often need to partition hard disks can save the number and size of partitions they want to partition the hard disk through preset values. The saved settings can be used directly the next time they use Quick Partition to partition the hard disk.
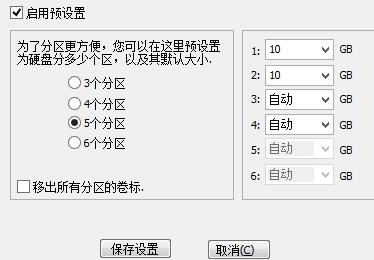
The preset interface is as shown in the figure:

"Presets" is used to change the default settings of the "Quick Partition" function. In the left column, you can set the number of partitions. For example: if you enable the preset and select "6 partitions", the "Quick Partition" panel will select 6 partitions by default. In the right column, you can set the size of the first five partitions, and the last partition size is the remaining disk capacity. You can also set the size only for some partitions and keep the default settings for other partitions.
"Remove all partition labels" function is used to remove the default volume label of each partition. For example: systems, software, documents, etc. If "Remove all partition labels" is checked, the Partition Assistant will not preset the volume label for you, and you can set the volume label yourself.
After the settings are completed, click "Save Settings". The system will save the preset settings. The preset configuration file is saved in the installation directory of the Partition Assistant. If operated through a bootable disk, the configuration file is saved in the root directory of the bootable disk (U disk).
Note: When using presets, the size of the last partition is automatic and a fixed size cannot be specified. For example: if presets create 3 partitions, then the first and second partitions can be specified with specific sizes, and the third partition can only be automatically sized.
6. Others
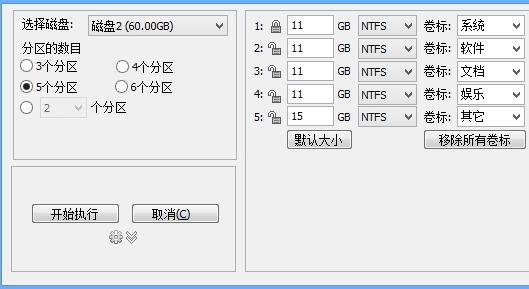
There is a small button on the right side of the preset button. Click this button to enter the streamlined mode window of Quick Partition. As shown in the figure, the streamlined mode looks cleaner and more refreshing:

在精简模式下,可选择要分区的硬盘,分区个数,分区大小,文件系统和设置卷标,其他设置保持默认状态。 At the same time, you can also click the settings icon to perform presets. To return to full mode, click the corresponding icon again.
The above article explains the detailed steps of partition assistant to quickly partition the disk. I hope friends in need can learn it.


