Hot search terms: 360 Security Guard Office365 360 browser WPS Office iQiyi Huawei Cloud Market Tencent Cloud Store

Hot search terms: 360 Security Guard Office365 360 browser WPS Office iQiyi Huawei Cloud Market Tencent Cloud Store

CAD software Storage: 1.44GB Time: 2022-04-22
Software introduction: CAD2018 is a very well-known CAD engineering drawing software launched by Autodesk of the United States. CAD2018 can be used...
Many people don’t know how to use parallel constraints in CAD2018? The article brought to you today is about the method of using parallel constraints in CAD2018. If you still don’t know, let’s learn it with the editor.
Step 1: Open the CAD2018 drawing software and find "New" in "File" in the upper left corner.

Step 2: Click New, select the corresponding template, and then create a new drawing interface as shown in the figure.

Step 3: Use the straight line shortcut key L to draw two non-parallel straight lines as shown in the picture.

Step 4: Find "Parameters" in the title bar, click on "Geometric Constraints", then click on "Geometry Constraints" to find "Parallel" inside.

Step 5: Click the "Parallel" command, and you will be prompted to "Select the first object". Here, select one of the straight lines, as shown in the figure.

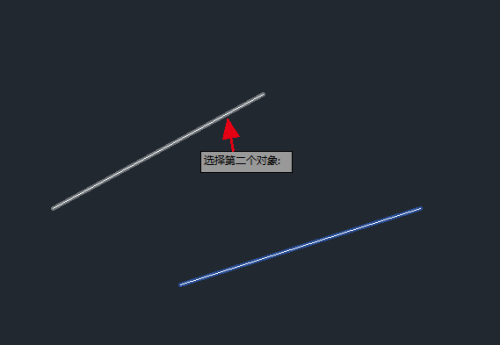
Step 6: Then it prompts "Select the second object", here select another straight line.

Step 7: Finally, the two straight lines are parallel. At this time, two parallel symbols will be displayed. The effect is as shown in the figure.

The above is the entire content of how to use parallel constraints in CAD2018 brought to you by the editor. I hope it can help you.
 How to draw a lottery in 360 Software Butler - How to draw a lottery in 360 Software Butler
 How to enable the purification function in 360 Software Butler - How to enable the purification function in 360 Software Butler
 How to clear favorite software in 360 Software Manager - How to clear favorite software in 360 Software Manager
 How to set the installation package cleaning time in 360 Software Manager - How to set the installation package cleaning time in 360 Software Manager
 How to collect software in 360 Software Manager - How to collect software in 360 Software Manager
 Microsoft Edge browser
 Steam
Steam
 Tencent Video
 WPS Office
 iQiyi
iQiyi
 Sohu video player
 Lightning simulator
 MuMu emulator
 Eggman Party
 What to do if there is no sound after reinstalling the computer system - Driver Wizard Tutorial
 How to switch accounts in WPS Office 2019-How to switch accounts in WPS Office 2019
 How to clear the cache of Google Chrome - How to clear the cache of Google Chrome
 How to fire bullets in scratch-How to fire bullets in scratch
 How to practice typing with Kingsoft Typing Guide - How to practice typing with Kingsoft Typing Guide