Hot search terms: 360 Security Guard Office365 360 browser WPS Office iQiyi Huawei Cloud Market Tencent Cloud Store
Hot search terms: 360 Security Guard Office365 360 browser WPS Office iQiyi Huawei Cloud Market Tencent Cloud Store

Astronomy and geography Storage: 349.15MB Time: 2022-05-18
Software introduction: The latest version of Global Mapper is a map drawing tool that can support batch downloading of Google Map modules. Global Mapper official version...
How to use Global Mapper to create a base site layer? There may be many friends who don’t know how to do it. So those who don’t know how to do it should come and learn with me how to create a base site layer with Global Mapper. I hope that this tutorial can help everyone.
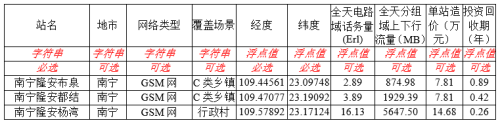
1. According to the data import format requirements, create the imported data (including base station name, longitude, latitude and other fields), as shown in the figure below, and save the relevant data in *.CSV or *.TXT format.
Note: The name of the communication base station and related parameters involved in this article are simulation parameters and do not exist in reality.
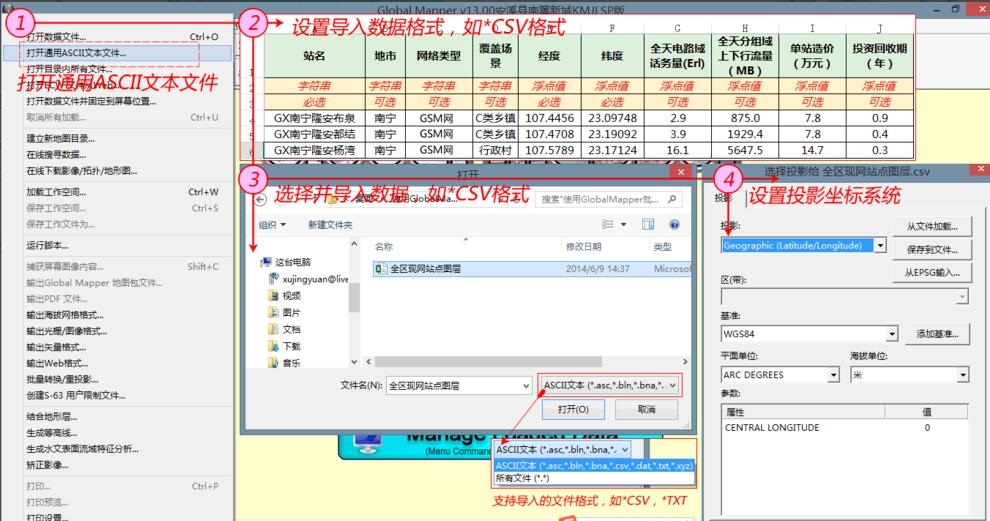
2. Use Global Mapper "File >> Open General ASCII Text File" and import it, and set the coordinate system of the projection. Generally, the default is enough, such as WGS84, as shown in the figure below.
Note: The imported files are *.CSV or *.TXT files, not *.XLS (Excel file format).
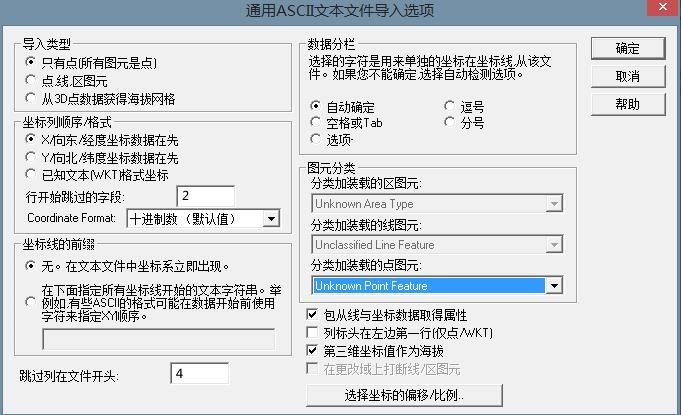
3. Set the "Universal ASCII text file import option", and then you can import points in batches. Setting the "Universal ASCII text file import options" is a critical step. The main points are as follows:
1. Import type
Here we mainly create a point layer, so we select "Only points (all primitives are points)".
2. Coordinate column order/format
There are three points to note: (1) Set the column order of the coordinates: the data format we created is the "Longitude" column, and the "Latitude" column is last, so select the "X/Eastward/Latitude coordinate data first" option. Otherwise, select the "Y/North/Latitude coordinate data first" option. (2) Set the number of rows where the file coordinate point data is located: In the data we create, the first row is the attribute name row, and the second row is the data row. If we enter 0, the attribute name will not be imported. If we enter 1, the row will start skipping one row of fields. If the data is in the second row, enter 2, and so on. (3) Set the coordinate data format: If the coordinate data is in decimal degrees, select decimal numbers (default). If it is degrees, minutes and seconds data, press the drop-down menu and select "Degrees as DDDMMSS.S". If it is integer degrees, minutes and decimal minutes format, select "Degrees as DDDMM.SS". The format produced here is in decimal format, just press the default.
3. Set the column where the coordinates are located
The coordinate data of the data we created here is located in the 5th column, so 4 columns must be skipped, that is, "fill 4 in the skip column at the beginning of the file", and so on.
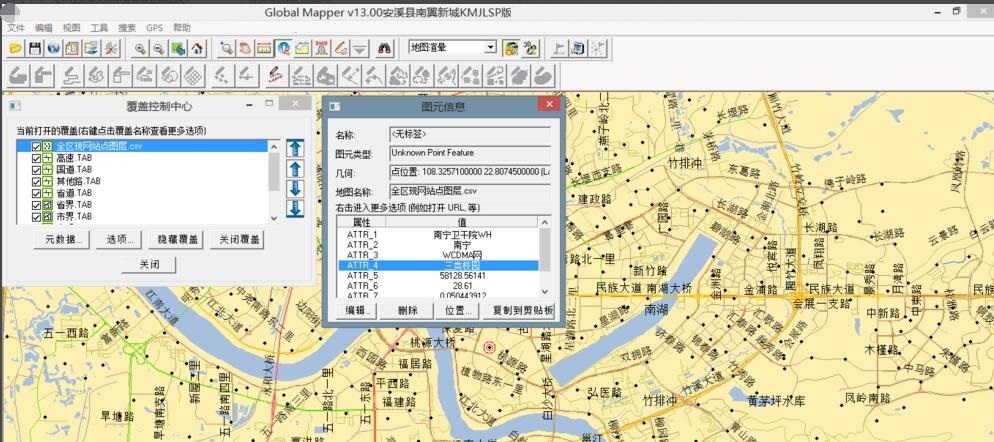
4. After the relevant parameters are set, the relevant sites can be imported, and the effect is as shown in the figure below.
Note: The picture below shows the effect of loading the map layer after importing points. If there is no actual map, it will only be a single point.
The above is the method shared by the editor to create a base site layer with Global Mapper. Friends in need can read this article.

 How to edit text in coreldraw - How to edit text in coreldraw
 How to cut out pictures quickly in coreldraw - How to cut out pictures quickly in coreldraw
 WPS Office 2023
 WPS Office
 Minecraft PCL2 Launcher
 WeGame
 Tencent Video
 Steam
Steam
 CS1.6 pure version
 Eggman Party
 Office 365
 What to do if there is no sound after reinstalling the computer system - Driver Wizard Tutorial
 How to switch accounts in WPS Office 2019-How to switch accounts in WPS Office 2019
 How to clear the cache of Google Chrome - How to clear the cache of Google Chrome
 How to upgrade the bootcamp driver? How to upgrade the bootcamp driver